Showing posts with label DCWV. Show all posts

Tuesday, December 14, 2010

Cute Gift Packaging with Wrap It Up

Wrap It Up is one of the few cartridges that I saw and thought "Nah, I'll pass".  I wasn't too crazy about the images and thought I could live without it.

That is, until I saw the boxes.


Oh, those boxes.

I own Tags, Bags, Boxes and More already, but the boxes and corresponding tags on Wrap It Up are so versatile and SO STINKING CUTE.  So, when the opportunity to snag it on eBay for $19 came up, I jumped.
Last month my mom and I went to a craft show and she saw a bracelet she really loved.  So, while she was looking at another booth I ran back and got it.  I wanted a cute package for it, and thought the Snowflake Box would work perfectly.  I just did Fit To Page ( I KNOW, no Gypsy!!) on some gold DCWV Christmas Combo paper and let my Cricut do her thing.  Then I folded at all the score lines and used my iRock to hotfix some blue bling onto the snowflakes.

I cut the tag at 3" using Core'dinations paper for both layers.  I tied the tag to the box with a little braiding cord and now I have an adorable little box under our tree :)


So, if you wrote off Wrap It Up when it was released last month, take another look.  You just might find something adorable on that cartridge!

Sunday, December 12, 2010

SweetSassyDiva Design Team: Perpetual Desktop Calendar

Hey everyone!  This week on the SweetSassyDiva Design Team our challenge was to make something using our Cinch, BIA or Your Story Photo.  I own a Cinch and LOVE it so I wanted to create something out of the ordinary.  A few months ago I saw a picture of a perpetual desktop calendar someone had made using a Bind-It-All, but with no instructions.  So, I decided to make up my own instructions and give it a go!
Recipe:
  • 4 pieces of lightweight chipboard
  • 5 pieces of coordinating cardstock
  • Cinch Binding Machine
  • Black 3/4" o-wires
  • Recollections "Flourish Month" Stamp Set
  • Inkadinkadoo "Months and Days" Stamp Set
  • Inkadinkadoo "Sketchy Flourishes" Stamp Set
  • Versamark Pad
  • Clear Embossing Powder

    To create the base, I cut a piece of chipboard at 8x12".  I scored it at 4 1/2" and 7 1/2" and covered the inside AND outside with black and white paper from the Black Currant Stack from DCWV.  I then took my Cinch and punched holes on both of the 8" side using the machine instructions.

    To create the small pieces, I cut 9 strips of 4 x8" chipboard and punched them on one of their 8" sides, pulling pegs 4, 8 and 12.  I then cut them into 2 x 4" strips.  I did the same with the paper and adhered the cut strips to the cardstock strips.
    I organized the strips in to corresponding piles and stamped them.  I bound the whole thing with my Cinch and VOILA!  A calendar I can use year after year.

    These would make great gifts for someone in your office or family, and they are so easy to make!  Here's a video walking you through it:


    Have a great week everyone!

    Monday, November 15, 2010

    SweetSassyDiva Design Team: "Joy" Banner

    Our challenge for SweetSassyDiva's Design Team project this week was to use the color green, use our Cuttlebug in some way, and to use felt.  I decided to make this "Joy" banner using chipboard coasters.  I used lovely green damask patterned paper from DCWV's "Christmas Combo" stack and inked around the edges of the coasters with Peeled Paint Distress Ink.  I really wanted to use my new digital carts on my Gypsy, so I used two in today's project, Blackletter and Christmas Solutions.  The word "Joy" is cut from the Blackletter Cartridge using the font and the shadow.  I ran the regular word through my Xyron and then used Martha Stewart Flocking in Ladybug to give the letters a "faux felt" effect.  After I flocked the letters, I ran it through my Cuttlebug using the D'Vine Swirls folder.  I love how you can emboss flocked letters!


    The snowflake is from the Christmas Solutions cartridge, and I cut the regular snowflake and the shadow as well.  I flocked the snowflake using MS Flocking in Swan. 

    I punched holes and set eyelets in all of the coasters using my Crop a Dile, and strung ribbon between the holes.  I think it turned out great and I love the traditional Christmas look :)


    This project came together in a SNAP thanks to my Gypsy girl.  I used a rounded 4 x4 square as a template to make sure I had everything sized correctly, then laid EVERYTHING out on one mat!  That's right, I got all my cuts done on one mat, in one turn on the Cricut.  Love it!

    Wednesday, November 3, 2010

    CJToo Design Team Wednesday: Fall Is In The Air!

    Happy Wednesday everyone! Today is Design Team Wednesday, and here is my project. This weeks theme was "Fall is In The Air", and we were asked to create a fall project that can be hung somewhere (door, wall, window, etc). I was visiting Marys blog at Cardz TV and she had made a cute little Halloween door hanger out of a paper towel roll.  I actually had an empty paper towel roll sitting on my craft table, just waiting to be made into something, so I took Mary's awesome idea and made it my own.

    Recipe:
    *Paper Towel Roll
    *Chipboard
    *DCWV "Amber Autumn" stack
    *Recollections Spice Market Stack
    *Large Ribbon
    *Cricut "Holiday Cakes" Cartridge
    *Gypsy Wanderings Cartridge
    *"Thanksgiving" Seasonal Cartridge
    *Perfect Pearls
    *Tim Holtz Distress Ink


    I ran the paper towel roll through my Cuttlebug using the A, B, and C plates.  After several good passes, I sealed the edges with Zip Dry so it would lay completely flat.  I covered the flat roll with patterned cardstock and then punched two holes on top and one hole on bottom with my Crop-A-Dile, and then set bronze eyelets in each hole.

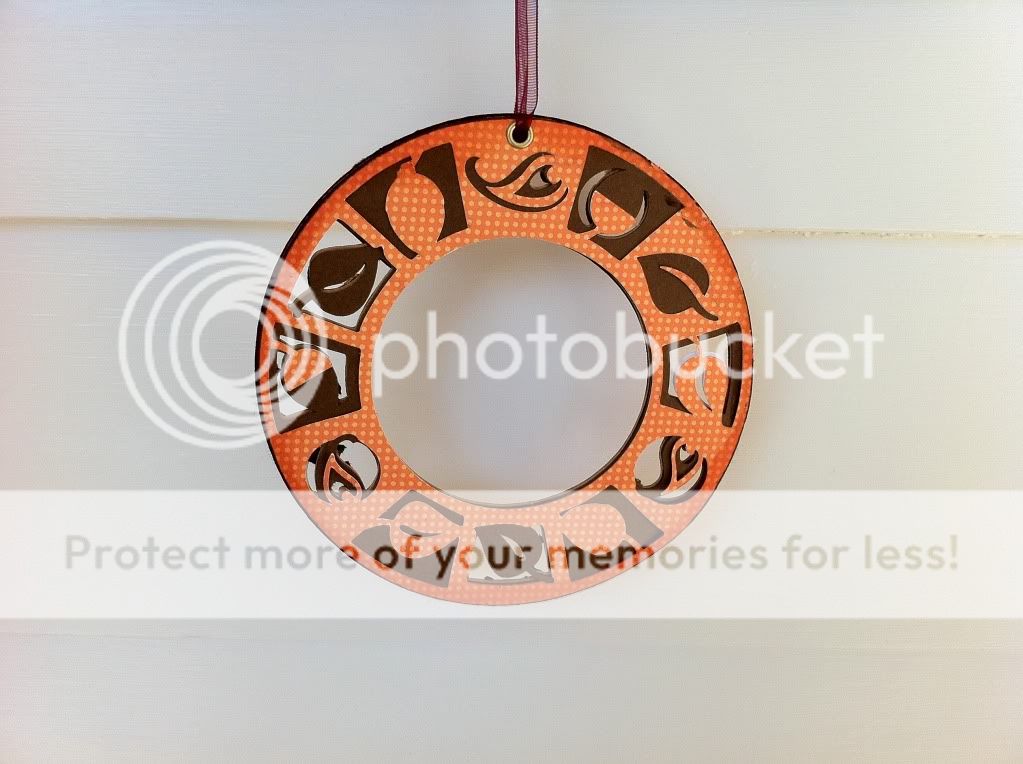
    For the spinning pendant, I found a perfect image on the Holiday Cakes cartridge.
      I cut it first out of recycled chipboard, and then covered BOTH sides with the brown and orange (I used "Flip" on my Cricut to make the back mirror the front).  That way, when it spins, both sides look the same :)  To finish off the pendant, I inked the inside and outside with Spice Marmalade Distress Ink

    Aren't the little pumpkin and leaf so adorable?  I cut them both from chipboard, and the Gypsy Wanderings cartridge.  I inked the edges in Spiced Marmalade and Walnut Stain Distress Ink, and then mounted them on large foam dimensionals so they really stand out from the paper.


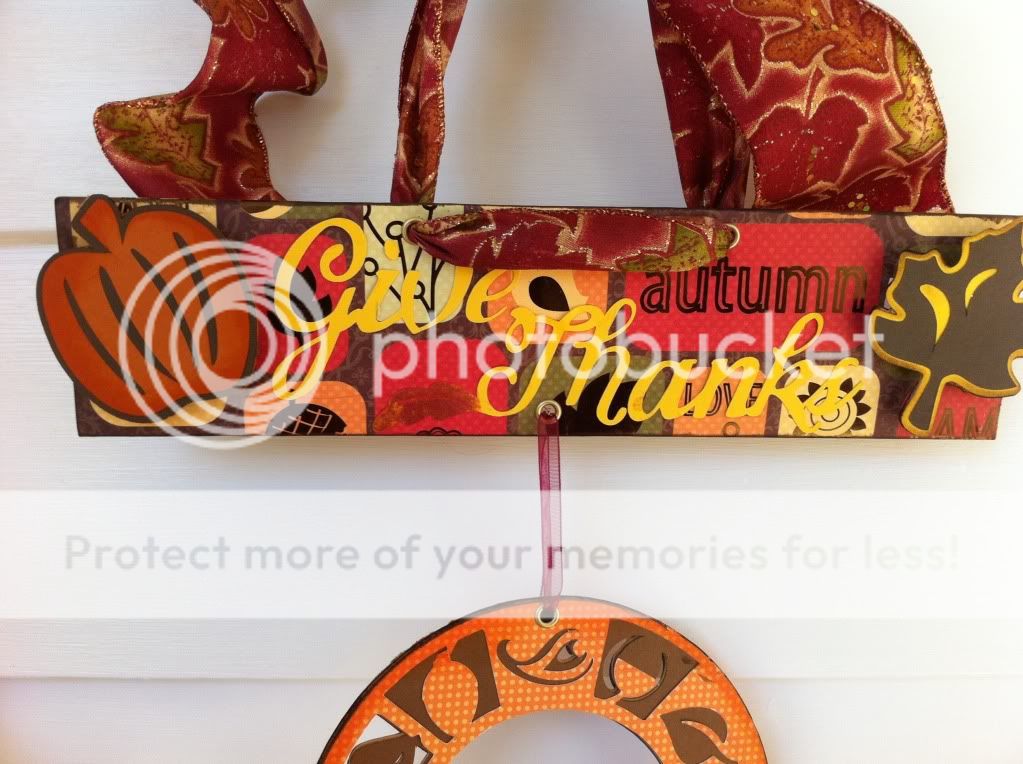
    "Give Thanks" is cut from the Thanksgiving Seasonal Mini.  I'm so glad I got that cartridge!  There are some great elegant images and sentiments for Fall and Harvest projects.  I inked the leaf on the word "Thanks" with Perfect Medium and then brushed on some Forever Red Perfect Pearls.  It makes it super shimmery :)


    So, what do you think?  I LOVE how it turned out, and it was so easy!  It's hanging off of our mailbox on the front of our house right now and it looks very cute.

    Make sure you stop by Cardz TV to see Mary's original Halloween banner, and then hop on over to Craft Junkie Too to check out the rest of Design Team #2's projects!

    Have a fabulous Wednesday everyone!

    Saturday, October 2, 2010

    "Boo" Recycled Mini Wordbook

    Hi everyone!  I hope everyone is having a fabulous weekend.  Today I've got a video showing you my newest project, a mini album/wordbook using recycled toilet paper rolls!

    I was browsing Cardz TV the other day and I saw a cute little fall mini wordbook she made for a blog hop.  I thought it was so neat that I had to try to make it myself.  It was so easy to make!

    I can't wait to explore the world of mini albums, but, I have to ask:

    Bind-It-All or Cinch?
    I want to get a binding machine but I just CAN'T make up my mind! If you own one of these machines, and have an opinion on why it's the one for me, leave me a comment!  I'd love to read what you think :)


    What you need:
    • 4 toilet paper rolls, cut in 1/2 inch intervals
    • Halloween Paper (I reccomend DCWVs "Midnight Spell" stack, it's fabulous!).  You need two pieces of patterned paper for each roll.
    • Cricut Happy Hauntings Cartridge (Fence, Tombstone Tags)
    • Cricut Birthday Cakes Cartridge (BOO font)
    • Cricut Holiday Cakes Cartridge (Pumpkins, Happy Halloween)
    • Crop-A-Dile and 3/16" eyelets
    • Binder Rings
    • Large Tags (cut to fit each pocket)
    • Tim Holtz Distress Inks in Spiced Marmalade, Dusty Concord, and Black Soot
    • Martha Stewart Halloween Clear Stamp Set
    • Versamark Pad, clear and black embossing powder
    • Stickles, brads, and any other embellishments you want to use

    Monday, September 27, 2010

    "Thankful" Fall Card Video

    We are FINALLY getting fall-like temperatures around here (yay open windows and no A/C!), so I was itching to use my new DCWV Amber Autumn Stack, so I whipped up a cute Joy Fold fall themed card.  This is also the first time I've inked the edges of all of my pages.  I was TERRIFIED of not doing it correctly and ruining my paper, but it all turned out find and I love the look it gives paper.  I finally bit the bullet and bought some Tim Holtz Distress Ink (In Walnut Stain and Spiced Marmalade) along with the applicator to use in a future project, I've pretty much decided I'm going to have to collect all the colors because I couldn't decide which ones I wanted!


    I hope everyone is having a happy Monday!  I'm in the process of working on a HUGE cupcake wrapper order that is pretty much dominating all of my craft time, but I hope to be done in a few days so I can play again!