Friday, January 28, 2011

The "Thank You" Blog Hop!

Good morning everyone!  Today is the first day of the "Thank You" blog hop.  You should have just come from Erikas blog!  This blog hop was put together by the lovely Raven to give a big THANK YOU to Madeline of The Shabby Vanity for our blog makeovers!


I don't know if any of my early followers remember my original blog design, but it was BAD.  I have no graphic design or HTML experience and it basically looked like it was thrown together by a fifth grader :)  I decided I wanted a more professional look so I used Madeline and her "5-Minute Makeover" plus some other a la cart items that she offers.  I could not be happier with the final result.  Everything looks professional and organized, and I LOVE my banner!  When I received word about this blog hop I couldn't wait to participate!


One of my favorite things about my new blog look is the cute cherry theme she has running throughout my blog.  From my background to the screen on my Gypsy I'm juggling, it's everywhere, and I love it!  I wanted to make a thank you card that incorporated those cute cherries, and this is what I came up with!
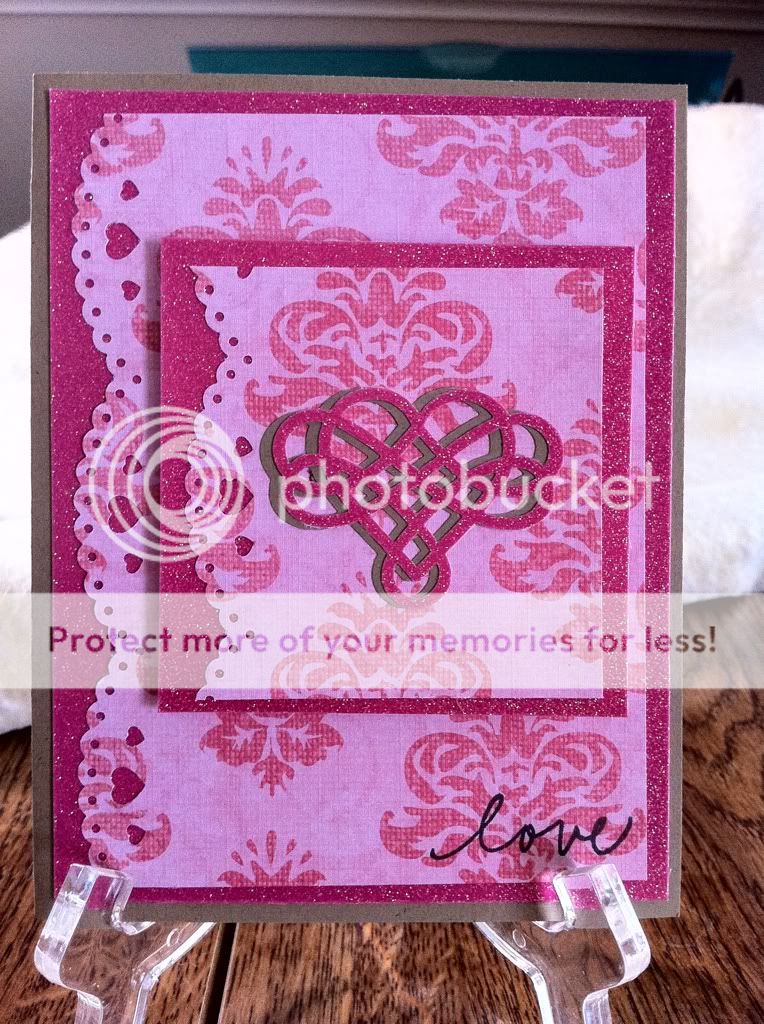
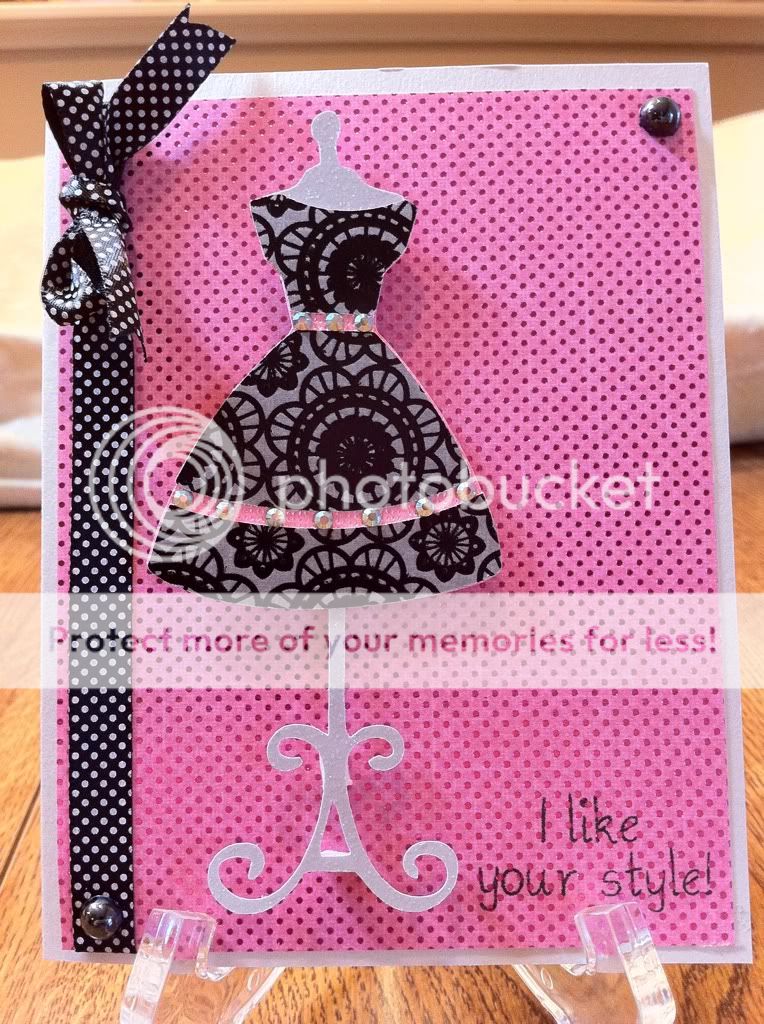


Recipe:
  • Wild Card Cricut Cartridge
  • George Cricut Cartridge
  • Paisley Cricut Cartridge
  • Peachy Keen "Everyday Character Faces" Assortment stamp set
  • Scrappy Moms "A Pinch and a Dash" stamp set
  • Ribbon from Michaels
  • Stickles

I cut the card base from the Wild Card cartridge, and then made two layering circles using George and my Gypsy to line them up.  The cherries are from Paisley cartridge and I used my favorite Peachy Keen face stamp set and pink chalk to give them an adorable touch.  I used Action Wobbles underneath each of the cherries so they pop up and wobble back and forth (hence the sentiment).  I used my white gel pen for some doodling and the whites of the eyes, Stickles on the leaf, and voila!  An adorable thank you card.


...you didn't think that's all I had for you today, did you?  How about a little blog candy??  I have TWO Martha Stewart Christmas punches to give away!

Wanna win a Poinsettia Vine Edge punch and a Present Punch and Stamp Punch?  Here's what you need to do:

  1. Become a follower of my blog
  2. Leave me a comment on this post (make sure you leave a way for me to contact you)
I will draw a winner on Monday, January 1st and email the winner.  You'll have one week to get back to me or I'll have to draw someone else.


Your next stop is Angela at Creative Craftin.  Make sure to check out everyone's projects!


Here's the list of everyone hopping today, and don't forget to stop by Madeline's blog and show her some love!


Raven-   http://love4stamps.blogspot.com/

Ruthie-     http://septemberninth.blogspot.com/

Theresa- http://www.thescrapbookingqueen.com/

Jennifer- http://crazyaboutcricut.blogspot.com/

Erika-     http://cricutlove1.blogspot.com/

Kristin-   http://kristinscraftykitchen.blogspot.com/ (You are here!)

Angela-  http://creativecraftin.blogspot.com/

Melissa- http://www.melissastampingvoila.blogspot.com/

Michele- http://www.nowstampthis.blogspot.com/

Zeni- http://www.scrappyzeni.blogspot.com/

Madeline- http://theshabbyvanity.blogspot.com/

Thursday, January 27, 2011

SSD Design Team: "Love" Toilet Paper Roll Mini Album

Hey everyone!  This week our project was to make something for Valentines Day BESIDES a card or layout using our Cricut.  I made an adorable Valentines Day toilet paper roll mini album using both my Gypsy and my beautiful new blue Expression, plus my favorite new Martha Stewart punches.


Recipe:

*Toilet Paper Rolls (I used 4)
*Patterned Paper
*Cuttlebug or Big Shot (for flattening rolls)
*Martha Stewart Elegant Cake Art Cartridge
*Cricut Classic Font Cartridge
*Tags, Bags Boxes and More Cartridge
*Scalloped Flower Gypsy File 
*Cinch or Bind It All
*Martha Stewart String Lace and Cherish Hearts Border Punches
*Martha Stewart Heart Lock and Key Punch
*Martha Stewart Flourish Heart Punch
*Pink By Design "All Girl" and "Scripted Year" stamp sets

This would be a cute little album to tuck those Valentines Day mementos in.  I love making these little albums!  I want one for every season of the year :)


Here's a video walking you through each page:


I wish I could claim ownership of the gorgeous flower file, but I got it from Jen from her awesome blog.  It's just like the Sizzix 3D flower die, but you can cut it with your Cricut at whatever size you want!

Friday, January 21, 2011

"Favorite Things" Blog Hop Winner!

First of all, I want to thank EACH and EVERY one of you that participated in the hop and left me such lovely comments.  I read each and every one of the 105 comments I received.  I love you all!

I used Random.org to pick a winner!

And the winner is..... Vanessa!

Congrats Vanessa!  You have one week to email me with your shipping info (click the cupcake on the left hand side of my blog), or I'll have to pick someone else.  Don't forget to email me!  :)


Speaking of blog hops, there's ANOTHER one coming up next weekend!
Join me for a blog hop thanking the lovely Madeline from the Shabby Vanity.  She gave my blog the beautiful makeover you see here, as well as a bunch of other crafty ladies, and we've gotten together to give her a big THANK YOU!  There will be a lot of awesome projects, yummy blog candy, PLUS you can win a 5-minute makeover from Madeline!  Be sure to stop by my blog on the 28th to find the full list of participating blogs!

Thursday, January 20, 2011

SSD Design Team: Valentines Day Box

Hey everyone!  This week at SSD our challenge was to create something for a Valentines Day Party.  I love to make a little something for my friends every year around Valentines, and this year I've decided to do chocolate covered Oreos (expect a blog post on that later!).  I wanted to make a cute box and tag to package the cookies in, and the boxes on Wrap It Up are just too cute not to use.  I used the blank box on the cartridge and cut it out of cardstock from DCWVs "Nana's Nursery: Baby Girl" stack.  Can you believe I don't have a stack just for Valentines Day?  I'll have to rectify that soon ;)


To spruce up the box, I used my new Martha Stewart Ruffled Heart Punch All Over the Page punch.  It punches a PERFECT window for these boxes and it was so easy to use!  I'm in love with these punches, I'm sure eventually I'll have them all :)

The tag is also from Wrap It Up, and I used clear Stickles on the flower.  The "To" and "From" stamps are from Pink By Designs Christmas Wishes Stamp Set.

Hope you enjoy!  I know my friends will love these.  Stay tuned tomorrow, I'm going to announce the winner from this past weekends blog hop!  Sorry it took so long, this week has gotten away from me for sure!

Saturday, January 15, 2011

"My Favorite Things" Blog Hop!

Welcome to The Crafty Kitchen and the ...A FEW OF MY FAVORITE THINGS Blog Hop! 
If you've come from visiting Lisa at My Lil' Bits, you're in the right place! If you've just happened across my blog and would like to play along with our fun hop, you can go to http://www.inkingitupcrazy.blogspot.com and start at the beginning. We would love to share a few of our favorite things with you today! 
Each Design Team member will be featuring an project made especially for this hop using their favorite crafting tools and techniques. Make sure to check out each member's blog. There will be some fun prizes along the way, AND there will be some AWESOME ideas! 


It was so hard for me to choose my "Favorite Thing" because I have SO MANY, and they change all the time.  Currently, my two absolute favorite things are my Pink By Design Stamps and my Martha Stewart punches.  Sarah over at Pink By Design makes the most wonderful stamp sets.  They are of amazing quality and are so versatile.  Although I adore my Cricut I'm also a punch junkie and I'm OBSESSED with Marthas punches and craft products.  Her new Valentines Day punches are GORGEOUS, so for this hop I decided to make a card using a few of her new punches.


Recipe:
  • Recollections Craft Cardstock
  • Pink patterned paper from Michaels
  • DCWV Midnight Spell Stack (glitter paper)
  • Martha Stewart Cherish Hearts Border Punch
  • Martha Stewart Flourish Heart Punch
  • Pink By Design "Scriped Year" Stamp Set

To create this card I used two of Martha's new Valentines Day punches:  the Cherished Hearts border punch and the Flourish Heart punch.  I think the Flourish Heart is my absolute FAVORITE punch right now, so I wanted the card to feature the gorgeous punched image.
I actually punched out two hearts, one in craft cardstock and one from the pink glitter paper, and layered them slightly off-center from each other.  


 The sentiment is from one of my absolute favorite Pink By Design Stamp sets, Scripted Year. Scripted Year can truly be used all year round and the font is just gorgeous.


Are you ready for some blog candy?  I figured a Martha punch would be a fitting giveaway today, since they are some of my favorite things :)


Even though the holidays are over, I know a lot of us are still scrapping Christmas, and this Punch and Stamp Set by Martha Stewart will look great on a layout, or for next years Christmas cards!  The punch comes with three different clear stamps to make three different gift boxes, and they store neatly inside.  So adorable!


In order to win, here's what you have to do:

  • Be a follower of my blog
  • Leave me a comment on this post telling me one of your favorite crafty things!
You have until Monday, January 17th to leave me a comment on this post.  I will then use random.org to find a winner, and post the winner here on my blog.  The winner will have one week to contact me, if I don't hear from them in a week I will have to pick someone else.

That's it for my Favorite Things today!  Your next stop is Jessie over at Scrappy Jess.  Hop on over to see what she has in store for you today!

Here's the full list of today's blog hop, make sure you visit everyone!  They have some GREAT projects for you!

Friday, January 14, 2011

SSD Design Team: "I Like Your Style" with Nifty Fifties

This week over at SweetSassyDiva our challenge was to create something using one of our new cartridges. I snagged Nifty Fifties during PaperCrafting Pros $13 cartridge sale, but I was a little apprehensive about using it. I was born in 1985, what in the heck was I going to do with all of these fifties images? Well, fear not my friends! Nifty Fifties is a truly versatile cartridge and you can make SO MANY wonderful things with it! Wanna see what I did?


Recipe:
  • Nifty Fifties Cartridge
  • DCWV Black Currant stack
  • i-Rock and gems
  • Martha Stewart black pearls
  • My Pink Stamper "Pinkalicious Puns" stamp set


One of the first images I was drawn to on the cartridge was the dress form and the cute little sock hop dress.  I cut the dress form from glitter paper and the actual dress from the Black Currant stack.  The dress comes with a buckle but it was too small to really work with, so I blinged up the dress with gems instead.

The sentiment is from the My Pink Stamper Pinkalicious Puns set.  I KNOW, I KNOW.  I didn't use a Pink By Design Stamp!  Are you shocked?  Trust me, I wanted to, but I don't own the Shopaholic stamp set...yet. Sarah, if you're listening, my birthday is next month ;)

All kidding aside, this is a great girly stamp set with lots of fashion sayings, and "I Like Your Style" went perfectly with the dress.

SO, there you have it!  If you ever have the opportunity to get Nifty Fifties (and it's going for really cheap these days) you should!  You'll be surprised what you can create with it :)

Wednesday, January 12, 2011

Vintage Flower Headband using the Imaginisce i-Top!

Remember when I told you I was in love with the Imaginisce i-Top?

Well, I wasn't lying.  It had me at hello.  I also knew as soon as I bought it I wanted to use it for more then just papercrafting.  Sarah over at Pink Cricut posted a video a few months ago that showed her making headbands, clips and rings for her daughter.  I loved it, but since I don't have children (yet), I knew I needed to expand on that idea and make accessories for adults to wear as well.

I love lollipop flowers.  They're easy to make, impossible to screw up, and they come out adorable every single time.   I couldn't think of a better vintage looking headband then a lollipop flower headband, so I set to work creating one.


Don't you just LOVE IT!!!!  I've got to share the recipe with you, because it is just too easy for you NOT to try it for yourself!


Recipe:
  • Imaginisce i-Top Tool
  • Small Twist Daddies
  • Imaginisce Headbands
  • Satin Fabric
  • Spellbinder Nestabilities- Standard Circles
  • Cuttlebug
  • Lighter or candle
  • Wide Ribbon
  • Hotfix Crystals
  • Feathers

I cut the circles out of the poly satin fabric using my Nestabilities and my Cuttlebug.  I know a lot of people make lollipop flowers using the Sizzix Circles #2 Die, or you can also cut them freehand.  I burned the edges of each circle with a lighter and then glued them all together with hot glue.  I used my Crop-A-Dile to punch a hole in the flower and then secured it to the headband using a Twist Daddy.


I made a short tutorial showing you how it's done:

The BEST part of this headband is I can make the flowers in a bunch of different colors, then simply pop them on the twist daddy and I have a headband that will coordinate with almost any outfit!
I truly hope you give these a try.  What a great way to repurpose your papercrafting tools!

Saturday, January 8, 2011

SSD Design Team: I-Top Snowman Card

Hey everyone!  This week at SSD out challenge was to recycle something into a project, or use something new we got for Christmas.  I combined them both into this card.

Even though Christmas is over, it is still definitely winter in my neck of the woods, so I decided to make a winter card.  I used my new Imaginisce I-Top that I got for Christmas to make a snowman out of brads.  Isn't he cute?


The i-Top was SO EASY to use and makes perfect brads every time.  Wait until you see my next project where I used ribbon and the i-Top, they're FLAWLESS :)

I used Recollections craft cardstock for the base and patterned paper from DCWVs Winter Combo stack.  The twine is recycled from a package I got for Christmas.  The sentiment is from Pink By Designs "Winter Fun" stamp set, which I punched out using an EK Success Punch.  The snowflakes are a Martha Stewart punch.


Speaking of Pink By Design, did you see that Sarah released some new stamp sets this week?  She also now carries super cute twine in her shop, and she started a Stamp Of The Month Club!  I HAD to join that one, we all know how much I love my Pink By Design stamps :)

Have a great day everyone!

Friday, January 7, 2011

Haven't done one of these in awhile...

A Haul video that is!  I also expect this to be one of the last haul videos I do this year, to keep with my "Use What I Have" 2011 goal!  I think I'm set for the rest of the year at this point ;)

Sunday, January 2, 2011

My Goals for 2011

Hey everyone!  I hope everyone enjoyed their New Years weekend.  Some of you are probably still recovering like me ;)

I've decided to set a few goals for myself for 2011.  I say "goals", not "resolutions", because resolutions are those superficial things you set on January 1st and never follow through with.  I'm hoping 2011 will be a better year for me then 2010, and I wanted to set some goals to make sure they happen.  I want to list them here so I can hold myself accountable for them later.  No worries, my regular crafty posts will resume tomorrow :)


Kristin's 2011 Goals:
  • Read at LEAST 50 books, and keep track of each one
    • I LOVE to read but I haven't been reading as much as I should lately.  I not only want to read at least 50 books, but I want to try genres that I usually never read, or would never think of reading.  I'm hopefully getting a Nook for my birthday because I already own so many books I'm running out of room!  You can also lend e-books free from the library!  So, if you have any good book recs, let me know :)
  • Jog with my dogs at least three times a week
    • Not only will this be good for me, it will be great for my dogs.  Dixie is full of energy and if she gets more exercise hopefully she will stop destroying my things ;)
  • Take more pictures
    • I need to start taking more pictures of my family and friends, so I will have plenty to scrapbook!
  • Make at least two cards a week
    • I really want to try to send birthday cards to all of my friends and family this year, but in order to do that I have to MAKE them!
  • Use up the supplies I HAVE, instead of buying more
    • I've only really been crafting since this summer, and I have already accumulated a TON of stuff!  I have an awesome new Expression, Gypsy, Cuttlebug, Cinch and many other useful tools.  My punch collection is slowly growing.  I own a ton of cartridges and a whole SLEW of Cuttlebug folders and dies (Nestabilities are my new obsession).  I have plenty of things to keep me busy!
  • Sing more.  Stress less.
    • Most of my bloggy friends don't know this, but my #1 passion in life is music.  I'm a classically trained vocalist and I've been preforming since the 6th grade.  I'm also a HUGE perfectionist when it comes to my voice.  I practice obsessively and if I don't think I can do it flawlessly, I won't do it.  I'm hoping to branch out this year and sing genres I'm not used to singing for fun and hopefully NOT STRESS OUT ABOUT IT!


So, there you have them?  What are your goals for 2011?  I would love to hear them!  Happy New Year everyone!