Showing posts with label Christmas. Show all posts

Thursday, December 30, 2010

The Last of My Christmas Projects!

Here is my LAST "Christmas Project" post of 2010.  I promise!

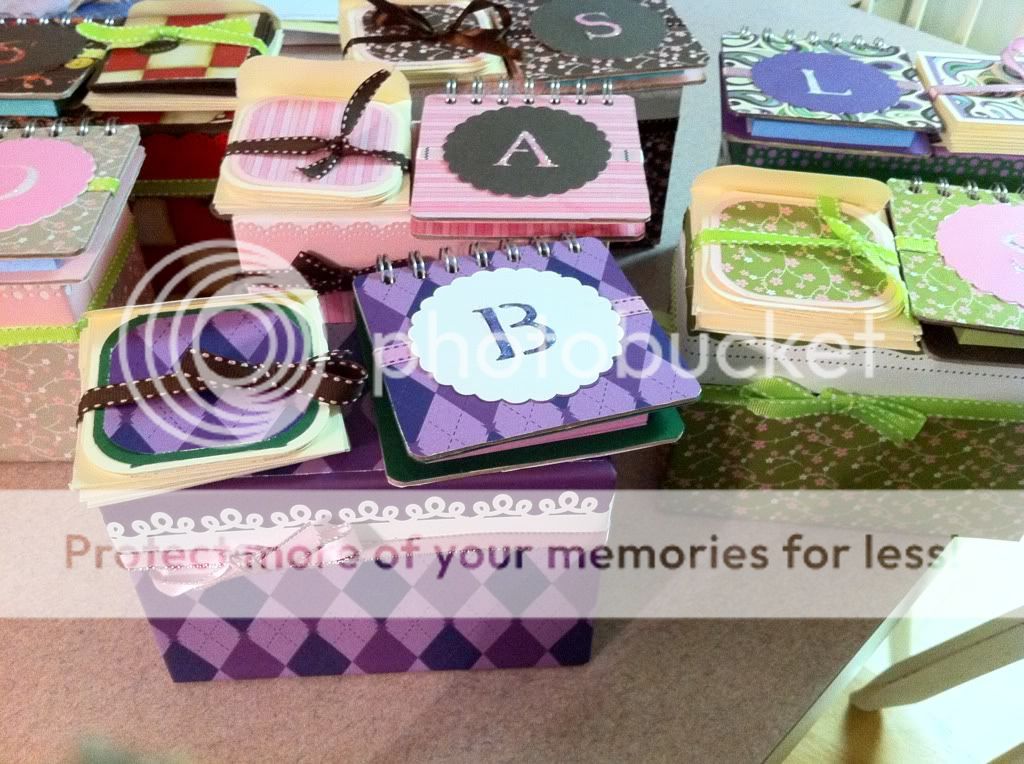
Do you remember the altered recipe box I made a few weeks ago for the Post It Blog Hop?  Well, I showed my Mom and she thought they would be wonderful gifts for her co-workers.  She wanted me to make some things to fill the boxes as well, so I decided to put a set of 3x3" cards and envelopes in each box, along with a monogrammed Post-It Note Holder.  I made SEVEN of these bad boys, and each one was different!


The only Cricut cut I used was for the monogram, and I used the Martha Stewart Elegant Cake Art cartridge.  Most of the patterend paper is from Recollections (I took my Mom to Michaels and let her pick out all the patterned paper), and most of the solid paper is Post-It Craft Paper!    

Each one had a different Martha Stewart border punch around the top, and I used Stickles on each of the monograms (hard to see in the photos).  I bound all the Post-It Note holders with my Cinch!

These are extremely cute and SUPER AFFORDABLE gifts.  The recipe boxes were $1.00 at Michaels, and we bought the paper and ribbon during a sale.  The Post-It Note holders are made from 4x4 chipboard coasters I got at Michaels on clearance for 30 cents a pack!

Wednesday, December 29, 2010

Yummy Holiday Cookies!

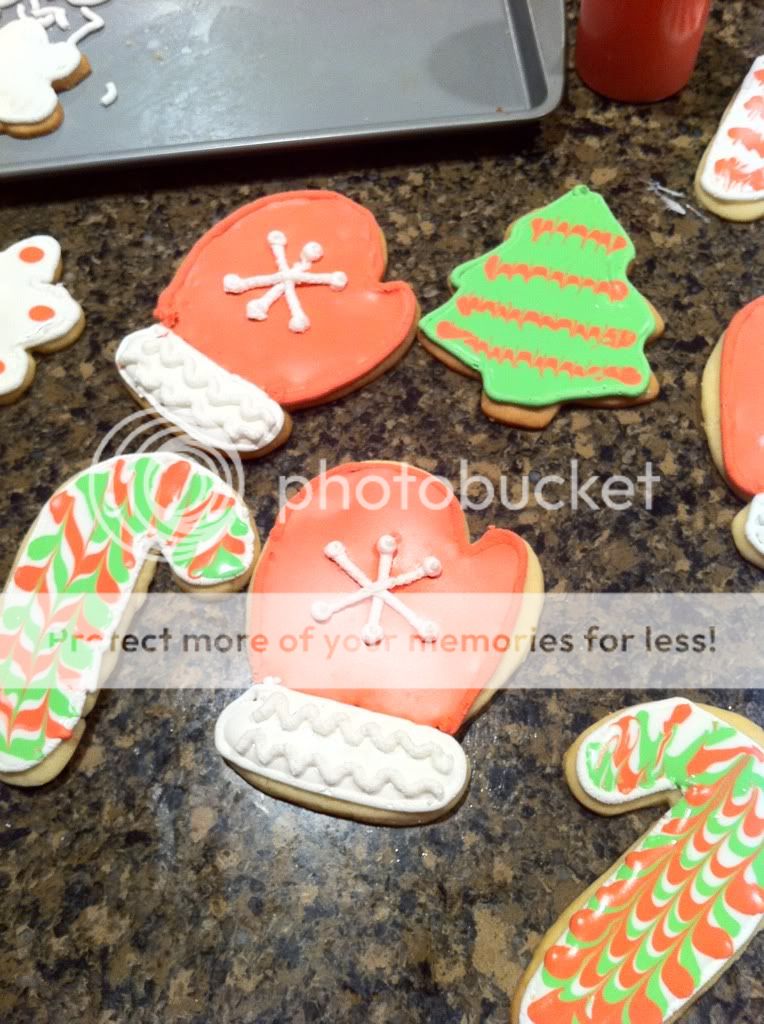
I needed to make a huge batch of cookies for a few holiday events last week.  I decided I didn't want to use my Cricut Cake, not because I don't love her (BECAUSE I DO), but because I love making Royal Icing flood cookies.  They taste so yummy and the possibilities are endless with what you can do with them.

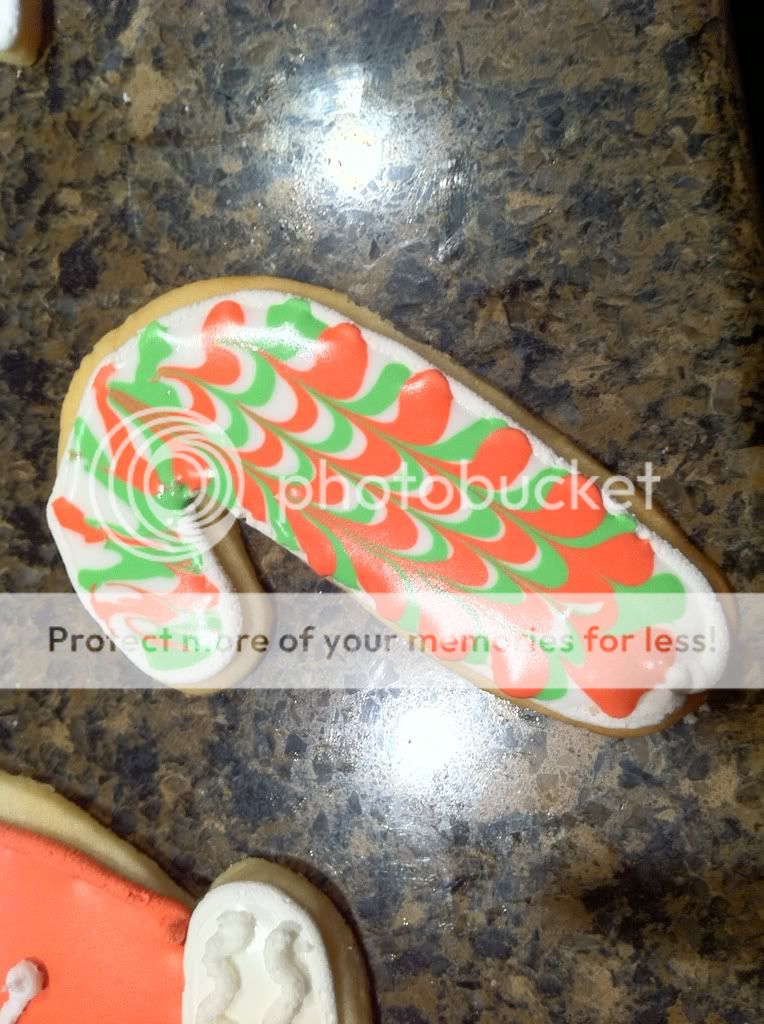
I think the mittens and the candy canes were my favorite.  I used a Christmas cookie cutter set that I have had for AGES for the shapes.  I colored a batch of the stiff royal icing to outline, and then once they had hardened, I added water to the remaining royal to make it flood consistency.  I colored them to match the outlines, filled squeeze bottles, and went to town.

The mittens were fairly simple.  After I flooded the red and white into the mitten and allowed them to dry, I piped white stiff royal on top.

To get the awesome swirl effect, I flood filled the candy canes with white, and then while they were still wet I made red and green stripes.  Because it is still wet the colored stripes sank into the white.  I then took a toothpick and just made lines down the candy cane.  Super simple and it really creates a gorgeous effect.

Here's the recipes I used for the cookies and for the icing.  If you're planning on making shape cookies, this is the all time go-to recipe.  It doesn't spread when baked, so your cookies retain their shape.


No Fail Sugar Cookies – NFSC

Ingredients

  • 6 cups flour
    3 tsp. baking powder
    2 cups unsalted butter
    2 cups sugar (white granulated)
    2 eggs
    2 tsp. vanilla extract or desired flavoring (I like almond myself)
    1 tsp. salt

Instructions

    Cream butter and sugar until light and fluffy. Add eggs and vanilla. Mix well. Mix dry ingredients and add a little at a time to butter mixture. Mix until flour is completely incorporated and the dough comes together.
  1. Chill for 1 to 2 hours (or see Hint below)
  2. Roll to desired thickness and cut into desired shapes. Bake on ungreased baking sheet at 350
  3. degrees for 8 to 10 minutes or until just beginning to turn brown around the edges. This recipe
  4. can make up to 5-dozen 3” cookies.
    HINT: Rolling Out Dough Without the Mess — Rather than wait for your cookie dough to
    chill, take the freshly made dough and place a glob between two sheets of parchment paper.
    Roll it out to the desired thickness then place the dough and paper on a cookie sheet and pop
    it into the refrigerator. Continue rolling out your dough between sheets of paper until you have
    used it all. By the time you are finished, the first batch will be completely chilled and ready to
    cut. Reroll leftover dough and repeat the process! An added bonus is that you are not adding
    any additional flour to your cookies.

    I got my royal icing from Bake at 350.  Actually, I get a TON of my recipes there.  She rocks :)  She even has picture directions, so you really have NO EXCUSE not to make these cookies!

Thursday, December 23, 2010

Jolly Snowman Ornaments

Hey everyone!  This week for the SweetSassyDiva Design Team our task was to make a last minute stocking stuffer.  I needed a last minute gift for some family members and thought these snowmen ornaments would be the perfect thing.  I originally saw this idea on Momos blog, and she has a video too!


Recipe:
*Large Glass Ornaments
*Pledge Floor Wax with Future Shine
*Martha Stewart Crystal Fine Glitter
*Martha Stewart Obsidian Pearls
*Red and White Pipe Cleaners
*Red Pom Poms
*Orange Glitter Paper
*Glue Gun

I have to say, I love the Pledge with Future Shine trick.  It coats the inside of the ornaments perfectly.  I did another set of ornaments using this technique, hopefully I can share them with you later this week.  I originally tried this with Martha's Coarse Glitter and it did NOT cover the inside of the ball well.  I switched to the Fine Glitter and it worked great :)


I also have to add that I did not own a glue gun before this project.

I KNOW.  Crazy, right?

I just never had need for one.  I bought the Martha Stewart 2 Temp Glue Gun, for two reasons.
1.) I really wanted to try the black hot glue next Halloween
2.) It's Martha Stewart, and everyone knows I own ALL of her stuff ;)

The gun worked great and now I have a glue gun for future projects :)


Have a great day everyone!  I hope you are all ready for Christmas :)

Wednesday, December 22, 2010

Craft Junkie Too Design Team: Glass Etching with Alcohol Inks

Hey everyone!  This week for the CJToo Design Team, our task was to create a Christmas project of our choice.  I've been Christmas decorating like crazy for the past few weeks, and I really wanted to make some pretty glass vases for the mantle.  I wanted to try glass etching for the first time, and I also wanted to play with my new Alcohol Inks for the first time, so I combined them both!

Recipe:
  • Glass Vases (I got mine from Dollar Tree)
  • Glass Etching Cream
  • Cricut Winter Lace Seasonal Cartridge
  • White Contact Paper (or vinyl)
  • Transfer Tap
  • Foam Brush
  • Ranger Alcohol Inks in the following colors:
    • Aqua
    • Sailboat Blue
    • Stonewashed
    • Silver Metallic Mixative
  • Ink Applicator


These were a little time consuming, but totally worth it.  I have a video walking you through each step, but basically you need to cut a stencil with your Cricut.  I used contact paper because vinyl is EXPENSIVE and I didn't feel like buying some just for a stencil.  I used the Winter Lace cartridge for my snowflake, but any ol' flake will do.  Just make sure that it isn't too detailed or fragile.

Lay the stencils on your glass and then apply your cream.  Has anyone else freaked out while looking at the price of glass etching cream?  HOLY COW!  Luckily I bought mine when I had a 50% coupon, but STILL.  That tiny bottle was EXPENSIVE!  The nice thing is that it doesn't take a lot to cover the stencil, and you can scrape it back in the bottle before washing, which is good, because at that price that bottle had better last me FOREVER!

After the etching it done, you put the INSIDE of the stencil (the part you usually throw away) on top of your etched image, making sure everything you want to see is covered, because the alcohol ink covers up EVERYTHING.  Including mistakes, which my first vase had a TON of.  I put on way too much etching cream on my first try and it ran EVERYWHERE, but luckily after inking you couldn't even see it.  Then, the fun part, the alcohol ink!

I want this stuff in every color.  It blends great and there really is no wrong way to apply it.  Don't like it?  Go back over it!  It's so great.
They turned out so pretty and unique looking.hard to believe they started as $1 vases!

Here's the video walking you through it:


Have a great day everyone!

Tuesday, December 14, 2010

Cute Gift Packaging with Wrap It Up

Wrap It Up is one of the few cartridges that I saw and thought "Nah, I'll pass".  I wasn't too crazy about the images and thought I could live without it.

That is, until I saw the boxes.


Oh, those boxes.

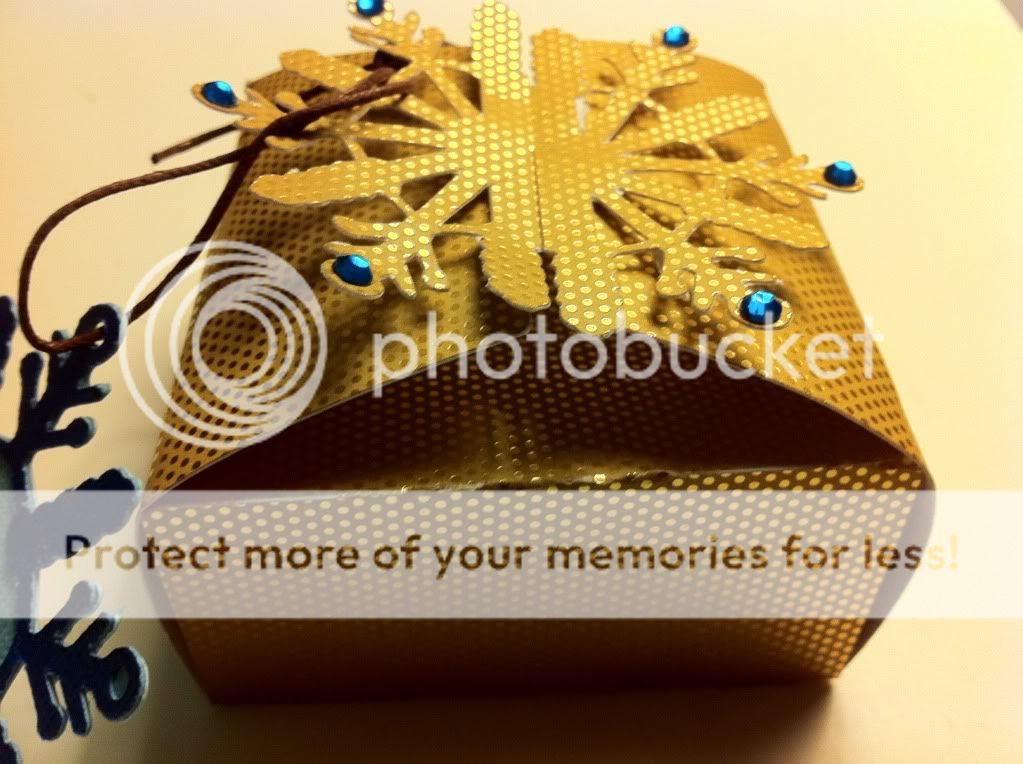
I own Tags, Bags, Boxes and More already, but the boxes and corresponding tags on Wrap It Up are so versatile and SO STINKING CUTE.  So, when the opportunity to snag it on eBay for $19 came up, I jumped.
Last month my mom and I went to a craft show and she saw a bracelet she really loved.  So, while she was looking at another booth I ran back and got it.  I wanted a cute package for it, and thought the Snowflake Box would work perfectly.  I just did Fit To Page ( I KNOW, no Gypsy!!) on some gold DCWV Christmas Combo paper and let my Cricut do her thing.  Then I folded at all the score lines and used my iRock to hotfix some blue bling onto the snowflakes.

I cut the tag at 3" using Core'dinations paper for both layers.  I tied the tag to the box with a little braiding cord and now I have an adorable little box under our tree :)


So, if you wrote off Wrap It Up when it was released last month, take another look.  You just might find something adorable on that cartridge!

Tuesday, December 7, 2010

Post-It Craft Paper Christmas Card


Hey everyone!  This week for the SweetSassyDiva Design Team, we needed to use our AWESOME new Post-It Craft paper to make a Christmas card.  I decided to make the mitten from Simply Charmed entirely out of the paper and put it through the ringer.  Let me tell you how much I LOVE this paper.  It cuts beautifully in the Cricut, embosses beautifully in the Cuttlebug, and is GREAT for flocking and glitter.  For his cuff, I kepIt the paper on the backing sheet, ran it through my Xyron and added Martha Stewart white flocking.  I used the Swiss Dots folder on the green and added MS pink glitter for his cheeks. 


The adorable patterned paper is from DCWVs Christmas Combo stack.  The green mat behind it is also Post it paper, which is AWESOME because I didn't have to break out my ATG and use my precious tape to adhere the big square!!

I used Pink By Design's "Christmas Wishes" stamp set for the cute sentiment, and then I topped it all off by popping the mitten up on an Action Wobble!  He looks SO CUTE wobbling back and forth on the card.  Here's a video on how to use the Action Wobbles:


A super adorable card and super QUICK thanks to the awesome Post It Craft Paper!

Monday, November 22, 2010

A Very Martha Stewart Christmas Card

Alright, I'm going to come right out and say it.

I'm obsessed with the card I made today, and can you believe I only used my Cricut for ONE cut???


But first, a story.

I saw Lorraine make a wreath out of the Martha Stewart Branch punch, and I fell in LOVE.  The only problem is you can't buy this punch in stores anymore.


 I immediatly scoured my craft room, hoping maybe I had purchased this punch without realizing it and and it was just hiding in a drawer somewhere.

No such luck.

It just so happened that my friend Matt, who is Martha Stewart obsessed like me, had this punch and wasn't using it.

I drove to his house and stole it I politely asked if I could borrow it and once I had it in my hands I couldn't wait to do my take on the wreath.


I punched two different shades of green, and glued them to a scalloped circle to create the wreath shape.  To make it shimmery, I took a Mini Mister and added Forever Green Perfect Pearls and spritzed it all over my wreath.  I know it's hard to see in my pictures (sorry for the crappy lighting) but the Perfect Pearls made the wreath shimmery and GORGEOUS.  I added a bow using the MS Ribbon Bow Punch, and I flocked the bow using my Xyron and Martha Stewart Ladybug flocking.

To create the door, I ran a piece of BROWN (yes, the door is brown, although it looks purple in my stupid pictures) cardstock through my Cuttlebug using the Distressed Stripes folder to give it a woodgrain look.  To make the panels, I used the Blackletter cartridge on my Gypsy.  Yes, I know that is totally random and I have no idea how I discovered that shape on there but it works PERFECTLY for door panels.  I made them faux chipboard by gluing three together (I ran the last piece through the same folder as the door before I glued it to the top).  THEN, I sprayed the panels with Tattered Leather Glimmer Mist to make them stand out a little more.  I used a brad as the door handle.

"Merry Christmas" is from the Pink By Design "Scripted Year" stamp set.  This set is BEAUTIFUL.  If you only buy one of her sets (which is scientifically impossible, by the way, I can't stop buying them), MAKE IT THIS ONE. 


So there you have it folks.  My new favorite Christmas card.  As soon as I finished it, I wanted to immediately mass produce them for all of my friends.   Make sure you stop by Card Creations By Lorraine and watch her tutorial on how to make that beautiful wreath.  She's also made one with the frond punch if you don't have the branch punch.

Don't tell Matt, but he's probably not getting this punch back ;)


Recipe:

  • DCWV "Christmas Combo" cardstock stack 
  • Martha Stewart Branch Punch
  • Martha Stewart Ribbon Bow Punch
  • Perfect Pearls in Forever Green
  • Mini Misters
  • Tattered Leather Glimmer Mist
  • Cricut Blackletter Cartridge
  • Pink By Design "Scripted Year" Stamp Set


Monday, November 15, 2010

SweetSassyDiva Design Team: "Joy" Banner

Our challenge for SweetSassyDiva's Design Team project this week was to use the color green, use our Cuttlebug in some way, and to use felt.  I decided to make this "Joy" banner using chipboard coasters.  I used lovely green damask patterned paper from DCWV's "Christmas Combo" stack and inked around the edges of the coasters with Peeled Paint Distress Ink.  I really wanted to use my new digital carts on my Gypsy, so I used two in today's project, Blackletter and Christmas Solutions.  The word "Joy" is cut from the Blackletter Cartridge using the font and the shadow.  I ran the regular word through my Xyron and then used Martha Stewart Flocking in Ladybug to give the letters a "faux felt" effect.  After I flocked the letters, I ran it through my Cuttlebug using the D'Vine Swirls folder.  I love how you can emboss flocked letters!


The snowflake is from the Christmas Solutions cartridge, and I cut the regular snowflake and the shadow as well.  I flocked the snowflake using MS Flocking in Swan. 

I punched holes and set eyelets in all of the coasters using my Crop a Dile, and strung ribbon between the holes.  I think it turned out great and I love the traditional Christmas look :)


This project came together in a SNAP thanks to my Gypsy girl.  I used a rounded 4 x4 square as a template to make sure I had everything sized correctly, then laid EVERYTHING out on one mat!  That's right, I got all my cuts done on one mat, in one turn on the Cricut.  Love it!

Thursday, November 4, 2010

"Homemade for the Holidays": Photo Album Word Book

Happy Thursday everyone!  Welcome to the first post for my "Homemade for the Holidays" series.  I am making a lot of my Christmas gifts by hand this year, and I wanted to share them all with you.  Hopefully you will see something that you would like to make yourself :)

My first project is a photo album word book for my friend who has a two year old son.  I thought this would be a perfect "brag book" she could take to work and keep in her office.  I made it interactive and brightly colored so people would want to pick it up and look inside :)

I used the following things to make this word book:


  • Make-The-Cut to weld the book together (I made it before I got my Gypsy girl!)
  • DCWV "Nana's Kids" and "All About Boys" stacks for the patterned paper
  • Cricut Cartridges
    • Create a Critter
    • Tags, Bags, Boxes and More
    • George and Basic Shapes
    • Birthday Cakes
    • Mini Monsters
  • Cinch Binding Machine
  • Walnut Stain Distress Ink
  • Martha Stewart Photo Corner Punch
  • Martha Stewart "Cherish" PATP Set
  • Martha Stewart "Bubble Bath" PATP Set
  • Martha Stewart "Ribbon Loop" PATP Set

Here's the video, I hope you enjoy it!

Saturday, October 9, 2010

Video: How to Make a Tri Shutter Card

Hi everyone!  I got quite a few emails asking me how I made my Thanksgiving Tri-Shutter card, so I thought I would make a quick tutorial on how I did it.  I'll also include the basic recipe, as well as all the measurements to make the card.

Robyn over at My Pink Stamper is having a Winter Challenge, so I thought this would be a great way to make a tutorial AND a challenge item at the same time!  I hope you enjoy it :)

Just remember, on the video I tell you the dimensions of each actual box on the card.  To make mats and add patterned paper, subtract a 1/4" from each dimension.  On the recipe I will give you the dimensions for my white cardstock mats.


Recipe:
  • 5.5" x 12" piece of green cardstock 
  • Martha Stewart Scoreboard (or any scoring tool)
  • Paper Trimmer
  • For front and back panels: 1 3/4" x 5 1/4" white cardstock 
  • For top and bottom panels: 1 1/4" x 1 3/4" (you need 2)
  • For the middle panels: 2 1/4" by 1 3/4" (you need 2),  2 1/4" by 3 3/4" (you need 1)
  • 3 by 5" piece of white cardstock
  • DCWV "Winter Combo" paper matstack (all cut 1/4 smaller than white cardstock)
  • Create a Critter for Reindeer (3 3/4") and "Joy" (1 1/2")
  • Crop a Dile and 3/16" eyelets
  • Martha Stewart Glitter Stamping Set (for snowflakes)
  • Martha Stewart Turquoise Glitter
  • Martha Stewart Stamp Setting Kit (for custom stamp on back)


    Have a fabulous day everyone!!