Showing posts with label Home Decor. Show all posts

Friday, July 15, 2011

Home Decor with my Yudu

In between making a ton of t shirts, I decided to try my hand at home decor with my Yudu.  I was loving these posters I had seen on Etsy, but couldn't justify paying $20 for it (picture from CafePress):

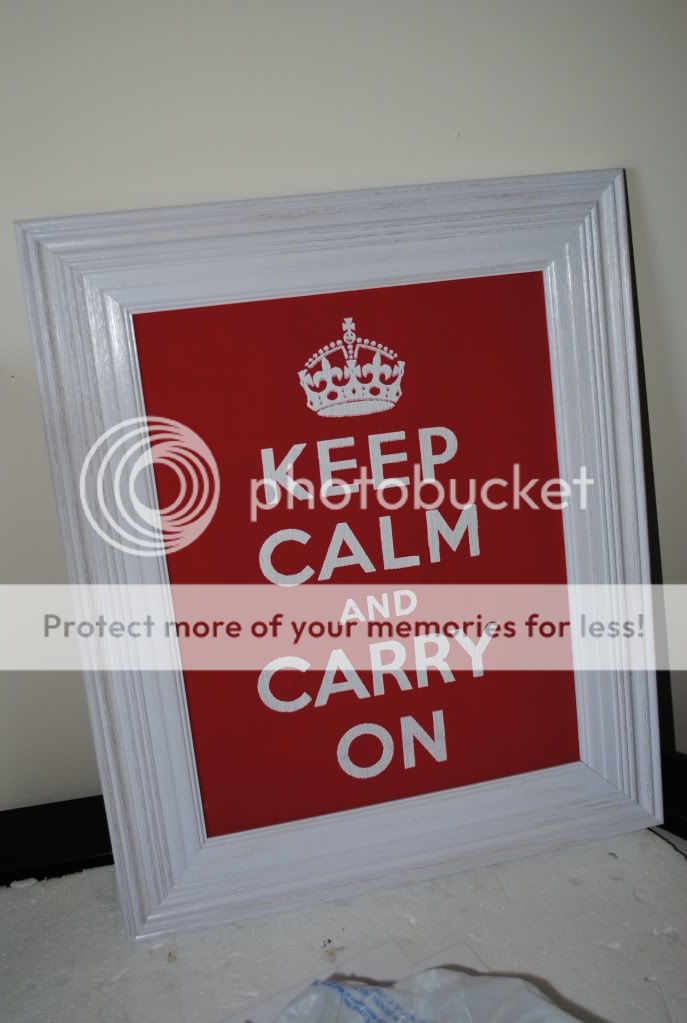
Luckily the actual image is public domain so I had my boyfried, who is a whiz at all things image editing  take the image and make it into an 8 x 11" transfer for my Yudu.

I bought canvas from Michaels with a coupon that applied to sale items when they were already 40% off.  The acrylic paint was less then 25 cents.  I used the entire bottle to cover the canvas, since I knew I wouldn't be using it again.


I screened the canvas using white Yudu ink.  I also made a matching t-shirt (pictured below).  Just a few passes and it was ready to go!


I knew I wanted to frame my canvas print, but open back frames are SO expensive, even with a coupon!  So, I found a super cute white frame on clearance at Michaels for $9.00, and simply took the glass and backing out.  I think it fits the canvas perfectly and looks great.  And all for waaaaay less then if I had bought a poster myself.


I am so happy with how this project turned out.  I can't wait to use my Yudu for more home decor projects!  Oh, by the way, Yudus are on sale until Sunday for $99.  This is the lowest I ever see them go (I bought mine for this price a few months ago) so if you haven't gotten one yet, this is a great deal!

Speaking of Michaels, have you seen their new iPhone App?  It is so awesome.  It stores all of the store coupons right on your phone, plus has an event schedule for stores in your area.  It's free in the app store!

Thursday, December 23, 2010

Jolly Snowman Ornaments

Hey everyone!  This week for the SweetSassyDiva Design Team our task was to make a last minute stocking stuffer.  I needed a last minute gift for some family members and thought these snowmen ornaments would be the perfect thing.  I originally saw this idea on Momos blog, and she has a video too!


Recipe:
*Large Glass Ornaments
*Pledge Floor Wax with Future Shine
*Martha Stewart Crystal Fine Glitter
*Martha Stewart Obsidian Pearls
*Red and White Pipe Cleaners
*Red Pom Poms
*Orange Glitter Paper
*Glue Gun

I have to say, I love the Pledge with Future Shine trick.  It coats the inside of the ornaments perfectly.  I did another set of ornaments using this technique, hopefully I can share them with you later this week.  I originally tried this with Martha's Coarse Glitter and it did NOT cover the inside of the ball well.  I switched to the Fine Glitter and it worked great :)


I also have to add that I did not own a glue gun before this project.

I KNOW.  Crazy, right?

I just never had need for one.  I bought the Martha Stewart 2 Temp Glue Gun, for two reasons.
1.) I really wanted to try the black hot glue next Halloween
2.) It's Martha Stewart, and everyone knows I own ALL of her stuff ;)

The gun worked great and now I have a glue gun for future projects :)


Have a great day everyone!  I hope you are all ready for Christmas :)

Wednesday, December 22, 2010

Craft Junkie Too Design Team: Glass Etching with Alcohol Inks

Hey everyone!  This week for the CJToo Design Team, our task was to create a Christmas project of our choice.  I've been Christmas decorating like crazy for the past few weeks, and I really wanted to make some pretty glass vases for the mantle.  I wanted to try glass etching for the first time, and I also wanted to play with my new Alcohol Inks for the first time, so I combined them both!

Recipe:
  • Glass Vases (I got mine from Dollar Tree)
  • Glass Etching Cream
  • Cricut Winter Lace Seasonal Cartridge
  • White Contact Paper (or vinyl)
  • Transfer Tap
  • Foam Brush
  • Ranger Alcohol Inks in the following colors:
    • Aqua
    • Sailboat Blue
    • Stonewashed
    • Silver Metallic Mixative
  • Ink Applicator


These were a little time consuming, but totally worth it.  I have a video walking you through each step, but basically you need to cut a stencil with your Cricut.  I used contact paper because vinyl is EXPENSIVE and I didn't feel like buying some just for a stencil.  I used the Winter Lace cartridge for my snowflake, but any ol' flake will do.  Just make sure that it isn't too detailed or fragile.

Lay the stencils on your glass and then apply your cream.  Has anyone else freaked out while looking at the price of glass etching cream?  HOLY COW!  Luckily I bought mine when I had a 50% coupon, but STILL.  That tiny bottle was EXPENSIVE!  The nice thing is that it doesn't take a lot to cover the stencil, and you can scrape it back in the bottle before washing, which is good, because at that price that bottle had better last me FOREVER!

After the etching it done, you put the INSIDE of the stencil (the part you usually throw away) on top of your etched image, making sure everything you want to see is covered, because the alcohol ink covers up EVERYTHING.  Including mistakes, which my first vase had a TON of.  I put on way too much etching cream on my first try and it ran EVERYWHERE, but luckily after inking you couldn't even see it.  Then, the fun part, the alcohol ink!

I want this stuff in every color.  It blends great and there really is no wrong way to apply it.  Don't like it?  Go back over it!  It's so great.
They turned out so pretty and unique looking.hard to believe they started as $1 vases!

Here's the video walking you through it:


Have a great day everyone!

Monday, November 15, 2010

SweetSassyDiva Design Team: "Joy" Banner

Our challenge for SweetSassyDiva's Design Team project this week was to use the color green, use our Cuttlebug in some way, and to use felt.  I decided to make this "Joy" banner using chipboard coasters.  I used lovely green damask patterned paper from DCWV's "Christmas Combo" stack and inked around the edges of the coasters with Peeled Paint Distress Ink.  I really wanted to use my new digital carts on my Gypsy, so I used two in today's project, Blackletter and Christmas Solutions.  The word "Joy" is cut from the Blackletter Cartridge using the font and the shadow.  I ran the regular word through my Xyron and then used Martha Stewart Flocking in Ladybug to give the letters a "faux felt" effect.  After I flocked the letters, I ran it through my Cuttlebug using the D'Vine Swirls folder.  I love how you can emboss flocked letters!


The snowflake is from the Christmas Solutions cartridge, and I cut the regular snowflake and the shadow as well.  I flocked the snowflake using MS Flocking in Swan. 

I punched holes and set eyelets in all of the coasters using my Crop a Dile, and strung ribbon between the holes.  I think it turned out great and I love the traditional Christmas look :)


This project came together in a SNAP thanks to my Gypsy girl.  I used a rounded 4 x4 square as a template to make sure I had everything sized correctly, then laid EVERYTHING out on one mat!  That's right, I got all my cuts done on one mat, in one turn on the Cricut.  Love it!

Wednesday, November 3, 2010

CJToo Design Team Wednesday: Fall Is In The Air!

Happy Wednesday everyone! Today is Design Team Wednesday, and here is my project. This weeks theme was "Fall is In The Air", and we were asked to create a fall project that can be hung somewhere (door, wall, window, etc). I was visiting Marys blog at Cardz TV and she had made a cute little Halloween door hanger out of a paper towel roll.  I actually had an empty paper towel roll sitting on my craft table, just waiting to be made into something, so I took Mary's awesome idea and made it my own.

Recipe:
*Paper Towel Roll
*Chipboard
*DCWV "Amber Autumn" stack
*Recollections Spice Market Stack
*Large Ribbon
*Cricut "Holiday Cakes" Cartridge
*Gypsy Wanderings Cartridge
*"Thanksgiving" Seasonal Cartridge
*Perfect Pearls
*Tim Holtz Distress Ink


I ran the paper towel roll through my Cuttlebug using the A, B, and C plates.  After several good passes, I sealed the edges with Zip Dry so it would lay completely flat.  I covered the flat roll with patterned cardstock and then punched two holes on top and one hole on bottom with my Crop-A-Dile, and then set bronze eyelets in each hole.

For the spinning pendant, I found a perfect image on the Holiday Cakes cartridge.
  I cut it first out of recycled chipboard, and then covered BOTH sides with the brown and orange (I used "Flip" on my Cricut to make the back mirror the front).  That way, when it spins, both sides look the same :)  To finish off the pendant, I inked the inside and outside with Spice Marmalade Distress Ink

Aren't the little pumpkin and leaf so adorable?  I cut them both from chipboard, and the Gypsy Wanderings cartridge.  I inked the edges in Spiced Marmalade and Walnut Stain Distress Ink, and then mounted them on large foam dimensionals so they really stand out from the paper.


"Give Thanks" is cut from the Thanksgiving Seasonal Mini.  I'm so glad I got that cartridge!  There are some great elegant images and sentiments for Fall and Harvest projects.  I inked the leaf on the word "Thanks" with Perfect Medium and then brushed on some Forever Red Perfect Pearls.  It makes it super shimmery :)


So, what do you think?  I LOVE how it turned out, and it was so easy!  It's hanging off of our mailbox on the front of our house right now and it looks very cute.

Make sure you stop by Cardz TV to see Mary's original Halloween banner, and then hop on over to Craft Junkie Too to check out the rest of Design Team #2's projects!

Have a fabulous Wednesday everyone!