Showing posts with label Martha Stewart Elegant Cake Art. Show all posts

Thursday, April 14, 2011

I'm BACK! (with a card too!)

Hi everyone!

I just want to apologize for being gone for so long without an explanation.  To make an INCREDIBLY long story short, my life got pretty crazy back in February and is just now getting back to some sense of "normal".  I'm fine, but there was a time where I just did NOT have the time (or energy) to craft or blog.  My poor Cricut was terribly neglected.  I also felt like I was losing a lot of my "crafty mojo", and didn't really have any good ideas.  I was doing a lot of crafting for design teams, challenges, etc but none really for ME.  Last week I finally booted up my Cricut again and everything came rushing back, so of course I had to bring my blog back to life!  I PROMISE to keep blogging as much as I can, hopefully 2-3 projects a week for awhile.  Once I'm able to move and put my craft room back together (another long story) it will be much more then that! :)

Also, I FINALLY HAVE A NEW DIGITAL CAMERA!  No more shots with my iPhone!  That, and I discovered my boyfriend has a super AWESOME professional light box so now I can take MUCH better pictures.

The card I wanted to show you today was one I made MONTHS ago for a Design Team that I never got around to posting, but I absolutely love it so I wanted to make sure I posted it.

We had to create a card based on a movie.  One of my favorite movies is Moulin Rouge, and I love the quote "The greatest thing you'll ever learn is just to love, and be loved in return".  I wanted to create a very vintage looking card with red as the main color that focused on this quote.  This is what I came up with:


The patterned paper is from the DCWV Black Currant stack.  Iinked everything with Vintage Photo Distress Ink to give it that aged look.

The quote is computer generated, and I punched it out of cream colored cardstock using an EK Success punch.  I inked the edges, popped it up on Pop Dots, and added two gems using my i-Rock.

In the movie, they call Satine the "Sparkling Diamond", so I knew I wanted a diamond somewhere on my card.  I found this heart shaped "diamond" on the Hannah Montana cartridge and thought it would work perfectly.  I both layers from red Core'Dinations cardstock, then ran the first layer through my Xyron and added red Martha Stewart glitter.  The red flowers are also from my stash with gemstone brads in the center.
The word "Love" is from the Martha Stewart Elegant Cake Art cartridge.  I used my i-Rock to add the "..." in bling after the word love.

Here is the rest of the quote on the inside of the card.  I punched this out using the same EK Success punch, then glued it to a piece of red cardstock and cut around to create a shadow.

I LOVE how this card turned out.  It looks vintage and lush, which reminds me of the Moulin Rouge.


I'm so happy to be back!  I want to thank all of my subscribers that emailed me over the last few months making sure I was OK.  I'm sorry if I didn't get back to all of you, but I really appreciated you thinking about me!  I promise I will have more cards and projects to come very soon!  :)

Thursday, January 27, 2011

SSD Design Team: "Love" Toilet Paper Roll Mini Album

Hey everyone!  This week our project was to make something for Valentines Day BESIDES a card or layout using our Cricut.  I made an adorable Valentines Day toilet paper roll mini album using both my Gypsy and my beautiful new blue Expression, plus my favorite new Martha Stewart punches.


Recipe:

*Toilet Paper Rolls (I used 4)
*Patterned Paper
*Cuttlebug or Big Shot (for flattening rolls)
*Martha Stewart Elegant Cake Art Cartridge
*Cricut Classic Font Cartridge
*Tags, Bags Boxes and More Cartridge
*Scalloped Flower Gypsy File 
*Cinch or Bind It All
*Martha Stewart String Lace and Cherish Hearts Border Punches
*Martha Stewart Heart Lock and Key Punch
*Martha Stewart Flourish Heart Punch
*Pink By Design "All Girl" and "Scripted Year" stamp sets

This would be a cute little album to tuck those Valentines Day mementos in.  I love making these little albums!  I want one for every season of the year :)


Here's a video walking you through each page:


I wish I could claim ownership of the gorgeous flower file, but I got it from Jen from her awesome blog.  It's just like the Sizzix 3D flower die, but you can cut it with your Cricut at whatever size you want!

Thursday, December 30, 2010

The Last of My Christmas Projects!

Here is my LAST "Christmas Project" post of 2010.  I promise!

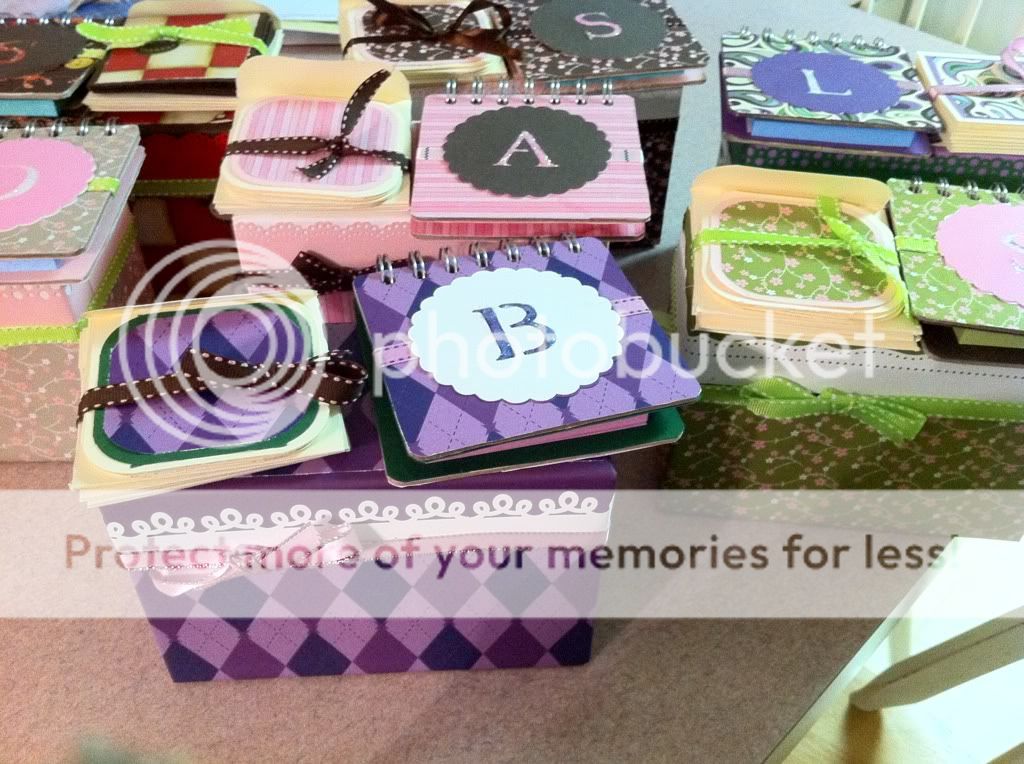
Do you remember the altered recipe box I made a few weeks ago for the Post It Blog Hop?  Well, I showed my Mom and she thought they would be wonderful gifts for her co-workers.  She wanted me to make some things to fill the boxes as well, so I decided to put a set of 3x3" cards and envelopes in each box, along with a monogrammed Post-It Note Holder.  I made SEVEN of these bad boys, and each one was different!


The only Cricut cut I used was for the monogram, and I used the Martha Stewart Elegant Cake Art cartridge.  Most of the patterend paper is from Recollections (I took my Mom to Michaels and let her pick out all the patterned paper), and most of the solid paper is Post-It Craft Paper!    

Each one had a different Martha Stewart border punch around the top, and I used Stickles on each of the monograms (hard to see in the photos).  I bound all the Post-It Note holders with my Cinch!

These are extremely cute and SUPER AFFORDABLE gifts.  The recipe boxes were $1.00 at Michaels, and we bought the paper and ribbon during a sale.  The Post-It Note holders are made from 4x4 chipboard coasters I got at Michaels on clearance for 30 cents a pack!

Wednesday, November 17, 2010

CJToo Design Team Wednesday: I Am Thankful For...

Welcome to another Craft Junkie Too Design Team Wednesday!  This week, our theme was "I Am Thankful For".  Before I explain my project, I have to thank Tracy over at CJToo for coming up with this theme and letting us have free reign.

Have you ever made a project, and the process of constructing it was totally therapeutic?  That's what this project was for me.  Before I started, I sat down and thought of everything and everyone I'm thankful for in my life, which lead me on the long journey to the completion of this project.

As most of my close friends know, I've been having a really rough time lately.  The stress of unemployment and a constant job search that seems to lead nowhere, coupled with ongoing personal issues have made the past few months difficult for me.  I have amazing family and incredibly supportive friends (plus my awesome bloggy companions) that have made things a little better for me, but there are two very special little "people" who have kept me going, even when I didn't want to continue.

My dogs.

That statement might sound strange to anyone who is not a pet owner, but Bella and Dixie have been my anchor for the past few months.  They love me unconditionally, and the sight of me is always the highlight of their day, whether I've been gone 30 minutes or 3 hours.  There were times when I honestly didn't want to get out of bed, but I had to in order to give them the care they need.  I could be having the absolute worst day ever, and all they have to do is come curl up in my lap and stare up at me with those adorable eyes, and I can't help but smile.


They are actually doing that as I type this :)

So, I really wanted to make a project dedicated to my dogs.  I came up with the idea of doing a paper bag mini album, so I could have a book full of pictures to look at whenever I felt down.  I had never made a paper bag mini before, so I found instructions on YouTube and gave it a go.

Here's the final result:


I tried to list everything I used in the video, because I used a lot of different cartridges and inks.  Hopefully I remembered them all :)


 I hope you truly enjoyed this mini album, as I had a BLAST making it.  Make you you hop over to http://www.craftjunkietoo.com and see all of Design Team 2's projects today!

Have a great Wednesday everyone!

Monday, August 30, 2010

Monogram Black and White Cookies

This is one of my favorite recent Cricut Cake creations.  Damask is totally trending in the wedding world right now, and how great would these cookies be for wedding favors, or even a bridal shower?

 Here's my recipe for how I made them.  I apologize for not having step-by-step pictures, I made these before this blog was born.  I'll be better next time, I promise :)
Damask Monogram Cookies

  • No-Fail Sugar Cookie Recipe (can be found here)
  • Black and white Fondant (I used Fondarific)
  • Something to use as "glue" (you can use anything from corn syrup, vanilla extract, or even water)
  • Martha Stewart Elegant Cake Art Cartridge  
 ...can I pause for a moment and just say how OBSESSED I am with this cartridge??

If you haven't picked up Marthas carts at HSN, do it NOW.  Run.  Do not walk.  They are the BEST carts for the Cricut Cake.  Everything cuts BEAUTIFULLY.

OK, back to our regularly scheduled programming.
The first thing I did was prepare the cookie dough on my mats.  Yep, you heard me right.  I CUT THE COOKIE DOUGH with the Cricut.  This is a little more complicated then it seems.  Your cookie dough has to be pretty much frozen solid or you WILL NOT be able to cut anything.  It will just tear and smear around the mat and make you pull your hair out.

Not that I know that from personal experience or anything...

I prep my mat with shortening, put a glob of cookie dough on the mat, and cover it with a piece of wax paper.  Then I take my rolling pin and go to town.  Take note: your cookies will have to be pretty thin to cut on the cricut.  

After rolling out the dough, I throw the mats in the freezer and freeze them.  This doesn't take long, so while the dough is freezing I set up my Cricut Cake.

I cut the scalloped circles at 3", and the damask cookies at 3.5", using the Autofill feature.  Each image would cut 9 times on a 12x12" mat.  After I cut them, I froze them AGAIN, to make removal easier.  The frozen cuts slid right off onto a cookie sheet.

While my cookies were baking, I cut my fondant, using the Flourish Frame and Damask image and the shadow on the cart at the same size as the cookies.  "Glue" together with whatever you use, and VOILA!


Trust me, they taste as good as they look :)
Stay tuned!  I have more goodies coming soon!