Showing posts with label Martha Stewart. Show all posts

Thursday, January 20, 2011

SSD Design Team: Valentines Day Box

Hey everyone!  This week at SSD our challenge was to create something for a Valentines Day Party.  I love to make a little something for my friends every year around Valentines, and this year I've decided to do chocolate covered Oreos (expect a blog post on that later!).  I wanted to make a cute box and tag to package the cookies in, and the boxes on Wrap It Up are just too cute not to use.  I used the blank box on the cartridge and cut it out of cardstock from DCWVs "Nana's Nursery: Baby Girl" stack.  Can you believe I don't have a stack just for Valentines Day?  I'll have to rectify that soon ;)


To spruce up the box, I used my new Martha Stewart Ruffled Heart Punch All Over the Page punch.  It punches a PERFECT window for these boxes and it was so easy to use!  I'm in love with these punches, I'm sure eventually I'll have them all :)

The tag is also from Wrap It Up, and I used clear Stickles on the flower.  The "To" and "From" stamps are from Pink By Designs Christmas Wishes Stamp Set.

Hope you enjoy!  I know my friends will love these.  Stay tuned tomorrow, I'm going to announce the winner from this past weekends blog hop!  Sorry it took so long, this week has gotten away from me for sure!

Saturday, January 15, 2011

"My Favorite Things" Blog Hop!

Welcome to The Crafty Kitchen and the ...A FEW OF MY FAVORITE THINGS Blog Hop! 
If you've come from visiting Lisa at My Lil' Bits, you're in the right place! If you've just happened across my blog and would like to play along with our fun hop, you can go to http://www.inkingitupcrazy.blogspot.com and start at the beginning. We would love to share a few of our favorite things with you today! 
Each Design Team member will be featuring an project made especially for this hop using their favorite crafting tools and techniques. Make sure to check out each member's blog. There will be some fun prizes along the way, AND there will be some AWESOME ideas! 


It was so hard for me to choose my "Favorite Thing" because I have SO MANY, and they change all the time.  Currently, my two absolute favorite things are my Pink By Design Stamps and my Martha Stewart punches.  Sarah over at Pink By Design makes the most wonderful stamp sets.  They are of amazing quality and are so versatile.  Although I adore my Cricut I'm also a punch junkie and I'm OBSESSED with Marthas punches and craft products.  Her new Valentines Day punches are GORGEOUS, so for this hop I decided to make a card using a few of her new punches.


Recipe:
  • Recollections Craft Cardstock
  • Pink patterned paper from Michaels
  • DCWV Midnight Spell Stack (glitter paper)
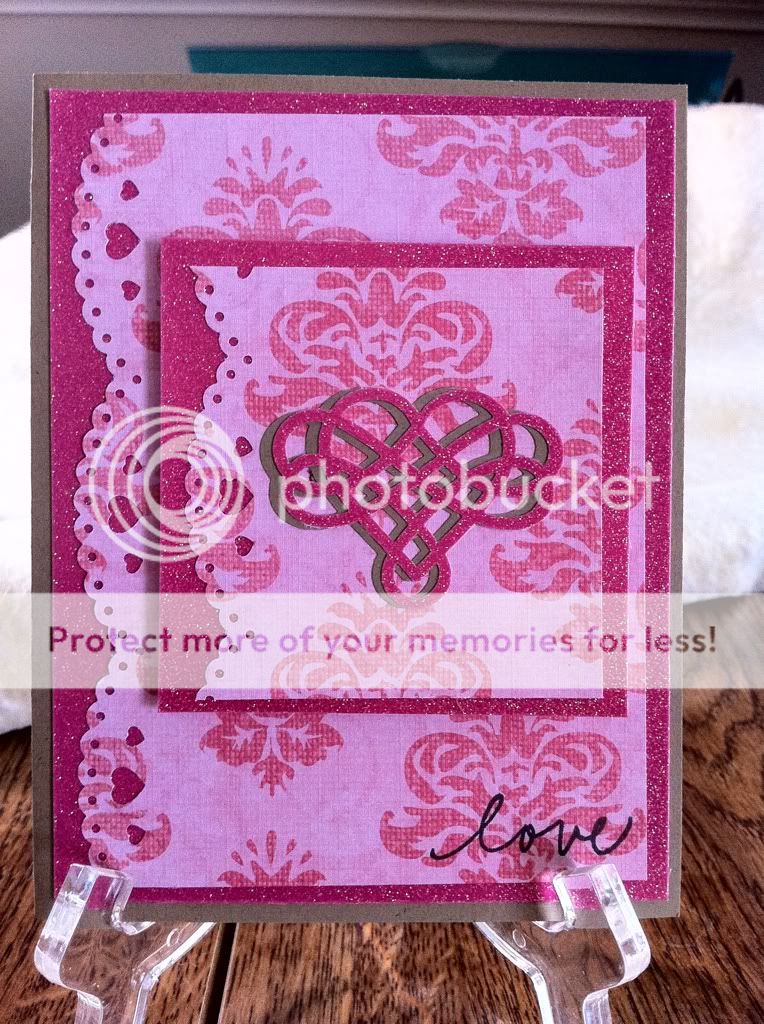
  • Martha Stewart Cherish Hearts Border Punch
  • Martha Stewart Flourish Heart Punch
  • Pink By Design "Scriped Year" Stamp Set

To create this card I used two of Martha's new Valentines Day punches:  the Cherished Hearts border punch and the Flourish Heart punch.  I think the Flourish Heart is my absolute FAVORITE punch right now, so I wanted the card to feature the gorgeous punched image.
I actually punched out two hearts, one in craft cardstock and one from the pink glitter paper, and layered them slightly off-center from each other.  


 The sentiment is from one of my absolute favorite Pink By Design Stamp sets, Scripted Year. Scripted Year can truly be used all year round and the font is just gorgeous.


Are you ready for some blog candy?  I figured a Martha punch would be a fitting giveaway today, since they are some of my favorite things :)


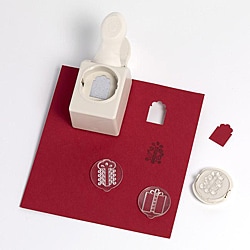
Even though the holidays are over, I know a lot of us are still scrapping Christmas, and this Punch and Stamp Set by Martha Stewart will look great on a layout, or for next years Christmas cards!  The punch comes with three different clear stamps to make three different gift boxes, and they store neatly inside.  So adorable!


In order to win, here's what you have to do:

  • Be a follower of my blog
  • Leave me a comment on this post telling me one of your favorite crafty things!
You have until Monday, January 17th to leave me a comment on this post.  I will then use random.org to find a winner, and post the winner here on my blog.  The winner will have one week to contact me, if I don't hear from them in a week I will have to pick someone else.

That's it for my Favorite Things today!  Your next stop is Jessie over at Scrappy Jess.  Hop on over to see what she has in store for you today!

Here's the full list of today's blog hop, make sure you visit everyone!  They have some GREAT projects for you!

Saturday, January 8, 2011

SSD Design Team: I-Top Snowman Card

Hey everyone!  This week at SSD out challenge was to recycle something into a project, or use something new we got for Christmas.  I combined them both into this card.

Even though Christmas is over, it is still definitely winter in my neck of the woods, so I decided to make a winter card.  I used my new Imaginisce I-Top that I got for Christmas to make a snowman out of brads.  Isn't he cute?


The i-Top was SO EASY to use and makes perfect brads every time.  Wait until you see my next project where I used ribbon and the i-Top, they're FLAWLESS :)

I used Recollections craft cardstock for the base and patterned paper from DCWVs Winter Combo stack.  The twine is recycled from a package I got for Christmas.  The sentiment is from Pink By Designs "Winter Fun" stamp set, which I punched out using an EK Success Punch.  The snowflakes are a Martha Stewart punch.


Speaking of Pink By Design, did you see that Sarah released some new stamp sets this week?  She also now carries super cute twine in her shop, and she started a Stamp Of The Month Club!  I HAD to join that one, we all know how much I love my Pink By Design stamps :)

Have a great day everyone!

Tuesday, December 28, 2010

Martha Stewart Valentines Day Goodness at Michaels!

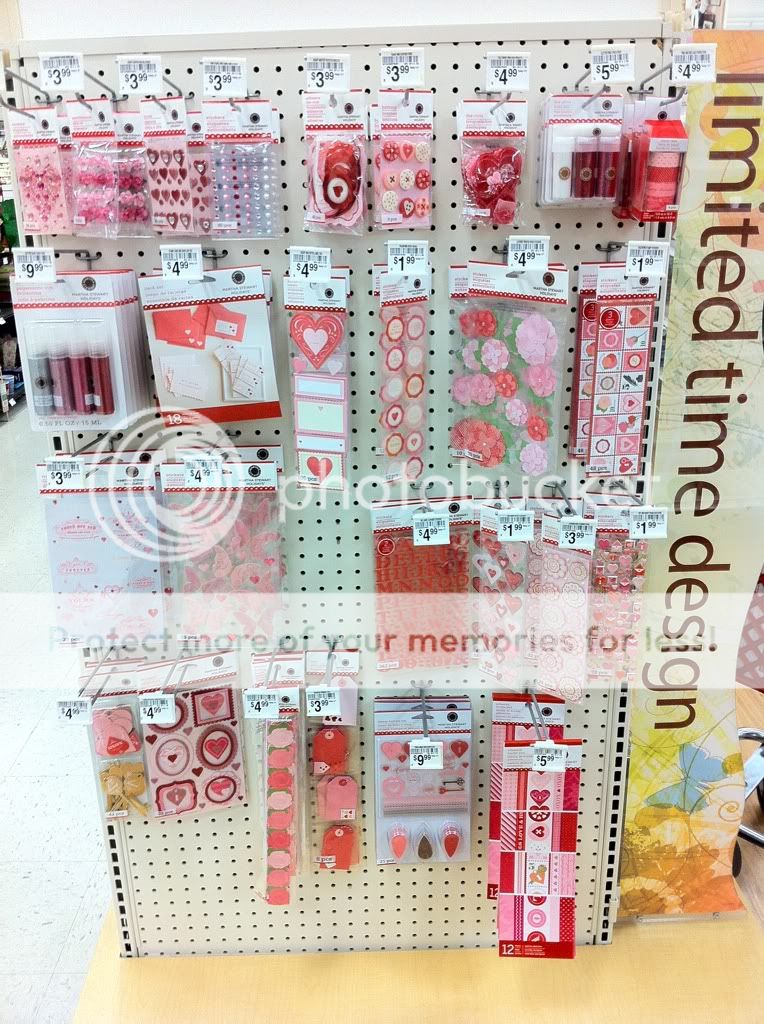
I'm taking a break from my post-Christmas posts to share with you the new Martha Stewart Valentines Day display at my Michaels.  There are TOO many things I want, so I just had to share!
She has some really great die cuts and glitter this season.  My personal faves:
  • The glitter glue pens.  Don't get me wrong, I love my Stickles, but if there was anyone I would give them up for, it would be Martha!  I will have to try these out!
  • Valentines Day Stamp Set.  Cute sentiments and three great colors!
  • Die cut butterfiles.  An ENTIRE page of pink, glittery die cut butterflies?  I'm in love!  :)

Now to the good stuff:  THE PUNCHES.  She has a really cute Valentines Day paper pack and mat pack, but let's be serious, I mostly care about the punches.  She has some GREAT new ones this season (I'm not sure what the Fiskars punch is doing there, but oh well).  I purchased three punches, and there is still one more I want.  My faves:

  • Filagree Heart Large Punch
I'm OBSESSED with this punch.  I love the way it looks and can be used for more then just Valentines Day.  I don't think I could get something that intricate in that size to come out well with my Cricut.
  • Heart Lock and Key Double Punch


Don't quote me, but I'm fairly certain she has released this punch before.  I'm almost positive my friend has one, but I don't, so I had to get it!
  • Cherish Heart Border Punch
I love the scalloped border!  I think this will look so cute on so many different cards.


There is also a really cute stamp and punch set and two heart Punch All Over the Page punches (which I also plan on getting).


Make sure you check out your Michaels and see if they have rolled out their new Martha stuff yet!  Also, all of her Christmas stuff is on clearance right now, so if your M's has any left (mine only had two things left), make sure to grab them!

Wednesday, December 8, 2010

Craft Junkie Too Design Team Day: Holiday Organization

This week for Craft Junkie Too, our task was to show something that we use to get organized for the holidays.

I'm not going to lie.  This was a challenge for me, mostly because organization is something I'm still working on in my every day life, not to mention the holidays.

I saw this cute little shopping organizer from Laura at Following the Paper Trail and knew this was something I could use to my advantage to stay organized this holiday season.  I wanted to make mine a notebook as well, so I took her idea and ran with it.

The cover is two pieces of 5x7 chipboard with a 3/4 x 7 strip in between.  I glued them down to a 12 x 8 inch piece of cardstock from the DCWV Christmas Combo Stack.  After I snipped the corners, I wrapped the cardstock around the chipboard and then added an inner piece that was slightly smaller.

The coupon expanding file is also taking from Laura's original organizer.  She simply took 4 x 8 pieces of cardstock and scored them at 3/4" on each side.  I took Terrifically Tacky Tape and taped the folded edges of one to the back of another until they were all adhered together.  After gluing on a front cover, you make the "binding" by taking a 2 1/2 x 6 1/2 strip, punching a border, and gluing it to the bottom.  Voila!  Expanding file.

The file tabs were made with the From My Kitchen cartridge.  I used my Gypsy to size them so they would be slightly bigger then the 4x6 paper I wanted to put in between.  I ran each file through my Snowflakes Cuttlebug folder.  I used my Cinch to bind the three sections of my "notebook" together, and then glued the back cover to the actual back cover of the book to keep it inside.

The front cover is very simple, as I knew this would be in my purse and I didn't want things falling off.
This is the Martha Stewart Vintage Dove Punch.  I have walked past that punch countless times in the last few months, and every time I had an internal argument with myself about whether I should buy it or not.  I finally bit the bullet and grabbed it and I'm SO glad I did.  I ran them both through my Xyron, added Martha Stewart Garnet glitter, and then covered them both with Glossy Accents after I realized that the glitter would go ALL OVER the inside of my purse if I didn't :)

Here's a video walking you through it:


Have a fabulous day everyone!  Don't forget to check and see if you won the Martha Stewart punch from the Post it Blog Hop this past weekend!

Monday, November 22, 2010

A Very Martha Stewart Christmas Card

Alright, I'm going to come right out and say it.

I'm obsessed with the card I made today, and can you believe I only used my Cricut for ONE cut???


But first, a story.

I saw Lorraine make a wreath out of the Martha Stewart Branch punch, and I fell in LOVE.  The only problem is you can't buy this punch in stores anymore.


 I immediatly scoured my craft room, hoping maybe I had purchased this punch without realizing it and and it was just hiding in a drawer somewhere.

No such luck.

It just so happened that my friend Matt, who is Martha Stewart obsessed like me, had this punch and wasn't using it.

I drove to his house and stole it I politely asked if I could borrow it and once I had it in my hands I couldn't wait to do my take on the wreath.


I punched two different shades of green, and glued them to a scalloped circle to create the wreath shape.  To make it shimmery, I took a Mini Mister and added Forever Green Perfect Pearls and spritzed it all over my wreath.  I know it's hard to see in my pictures (sorry for the crappy lighting) but the Perfect Pearls made the wreath shimmery and GORGEOUS.  I added a bow using the MS Ribbon Bow Punch, and I flocked the bow using my Xyron and Martha Stewart Ladybug flocking.

To create the door, I ran a piece of BROWN (yes, the door is brown, although it looks purple in my stupid pictures) cardstock through my Cuttlebug using the Distressed Stripes folder to give it a woodgrain look.  To make the panels, I used the Blackletter cartridge on my Gypsy.  Yes, I know that is totally random and I have no idea how I discovered that shape on there but it works PERFECTLY for door panels.  I made them faux chipboard by gluing three together (I ran the last piece through the same folder as the door before I glued it to the top).  THEN, I sprayed the panels with Tattered Leather Glimmer Mist to make them stand out a little more.  I used a brad as the door handle.

"Merry Christmas" is from the Pink By Design "Scripted Year" stamp set.  This set is BEAUTIFUL.  If you only buy one of her sets (which is scientifically impossible, by the way, I can't stop buying them), MAKE IT THIS ONE. 


So there you have it folks.  My new favorite Christmas card.  As soon as I finished it, I wanted to immediately mass produce them for all of my friends.   Make sure you stop by Card Creations By Lorraine and watch her tutorial on how to make that beautiful wreath.  She's also made one with the frond punch if you don't have the branch punch.

Don't tell Matt, but he's probably not getting this punch back ;)


Recipe:

  • DCWV "Christmas Combo" cardstock stack 
  • Martha Stewart Branch Punch
  • Martha Stewart Ribbon Bow Punch
  • Perfect Pearls in Forever Green
  • Mini Misters
  • Tattered Leather Glimmer Mist
  • Cricut Blackletter Cartridge
  • Pink By Design "Scripted Year" Stamp Set


Monday, November 15, 2010

SweetSassyDiva Design Team: "Joy" Banner

Our challenge for SweetSassyDiva's Design Team project this week was to use the color green, use our Cuttlebug in some way, and to use felt.  I decided to make this "Joy" banner using chipboard coasters.  I used lovely green damask patterned paper from DCWV's "Christmas Combo" stack and inked around the edges of the coasters with Peeled Paint Distress Ink.  I really wanted to use my new digital carts on my Gypsy, so I used two in today's project, Blackletter and Christmas Solutions.  The word "Joy" is cut from the Blackletter Cartridge using the font and the shadow.  I ran the regular word through my Xyron and then used Martha Stewart Flocking in Ladybug to give the letters a "faux felt" effect.  After I flocked the letters, I ran it through my Cuttlebug using the D'Vine Swirls folder.  I love how you can emboss flocked letters!


The snowflake is from the Christmas Solutions cartridge, and I cut the regular snowflake and the shadow as well.  I flocked the snowflake using MS Flocking in Swan. 

I punched holes and set eyelets in all of the coasters using my Crop a Dile, and strung ribbon between the holes.  I think it turned out great and I love the traditional Christmas look :)


This project came together in a SNAP thanks to my Gypsy girl.  I used a rounded 4 x4 square as a template to make sure I had everything sized correctly, then laid EVERYTHING out on one mat!  That's right, I got all my cuts done on one mat, in one turn on the Cricut.  Love it!

Tuesday, October 12, 2010

Martha Stewart Custom Stamp Setting Kit

I was perusing the Cricut Message Board last night, and a few lovely ladies had questions about the new Martha Stewart Custom Stamp Setting Kit I found at Michaels last week.  I made a quick video to show you exactly what's inside and how it works.


I hope everyone is having a fabulous Tuesday!  Stay tuned to my blog for the next few weeks, I have something exciting planned! :)

Sunday, October 10, 2010

Glow in the Dark Mummy Card

Hi everyone!  First off, I would like to give a big HELLO to all of my new followers.  We're up to 75 followers in my little corner of the blogosphere, 25 to 100 (and a giveaway!)  I truly thank all of you for choosing to follow my blog.  I hope you are inspired by my projects.  I have a lot more planned for this blog (including Cricut Cake stuff!  I REALLY need to put some up!), and I'm glad you are here to experience it with me :)

I finally broke down last week and bought the Martha Stewart Glow in the Dark Glitter.  I saw it was cheaper at JoAnns then at Michaels, so I used a coupon and bought it.
The first thing you should know about this glitter is that it REALLY glows in the dark!  I couldn't get a good picture, but MAN it glows.  Just make sure you leave your project out in the light for awhile beforehand to "charge".  In the daylight, it looks like a clear, fine glitter that looks really nice on projects.  I really wanted to test it out, so I threw together a Halloween easel card that I knew her glitter would work on.


Recipe:
  • 4 1/4" by 11" piece of purple cardstock
  • 4 1/4" by 5 1/2" piece of black cardstock
  • Midnight Spell Matstack (for mat)
  • Midnight Spell Glitter Matstack (for green glitter paper)
  • Happy Hauntings cartridge (for mummy)
  • Michaels Dollar Bin Stamp
  • White Embossing Powder
  • Versamark Stamp Pad
  • Martha Stewart Glow in the Dark Glitter
  • Martha Stewart Glitter Glue
  • Martha Stewart Drippy Goo Punch
  • Recollections brads
  • White Gel Pen

This is your standard A2 easel card.  You can make the sentiment any width or length you'd like, as long as there is enough room for the easel to "pop up" on.  I embossed my sentiment with white embossing powder (much easier then stamping in white).

I don't have a Xyron (I really need one) so I had to go over the whole mummy with MS glitter glue before applying the glitter.  Make sure you give him plenty of time to dry before putting him on your card.  I used pop dots to adhere him, and cut little tiny ones for all of his limbs and the wrapping so he would be supported.

Wanna know the best part?

I mixed in a little of the Glow in the Dark Glitter in with the white embossing powder, so the SENTIMENT glows in the dark too!!!  LOVE IT!

If you have this glitter and haven't broken it out yet, you SHOULD!  It's so much fun to play with :)

I hope everyone is having a wonderful weekend!  Hopefully I should have some BAKING projects up this week, so stay tuned!

Tuesday, September 14, 2010

My HSN Day of Crafting Wish List

Is anyone else as exhausted as I am from staying up late for the Imagine launch?  I've been glued to the TV ALL day!  Cricut, Tim Holtz, Martha Stewart...I just can't stop.  I've also been extremely good and bought NOTHING.


That hasn't stopped me from doing some serious window shopping.  ;)

My Christmas list is slowly expanding, and I thought I would make a post showcasing everything I've wanted to buy today (if I had unlimited funds).


1.) Cricut Imagine
I think I may be the only Cricut lover on the planet that doesn't have a Cricut Expression.  My Cricut Cake was actually my very first Cricut purchase, and then I inherited a Baby Bug, which fueled my paper crafting obsession.  I've been on the fence about buying an Expression for a long time, and now I'm wondering if I should just get an Imagine and be done with it.  The price tag is kind of insane.  I'm hoping someone that loves me very much will buy this for me for Christmas using Flex Pay ;)  (wink wink, nudge nudge)

2.) Tim Holtz Distress Ink Pad Set
 
I also think I'm the only crafter on the planet that doesn't own any Distress Inks.  I see them in craft stores and I always pass them by, mostly because I'm terrified of inking.  I don't know why, I just am.  Tim did a demo today on HSN that totally sold me on inking.  These sets sold out ridiculously fast today, and I got a little depressed that I was being strong and didn't buy them.  I guess I'll have to start hoarding 40% off coupons and buying a few at Michaels.

3.)  Martha Stewart Halloween Foil and Flocking Transfer Kit


OK, I'm not going to lie, I may go ahead and buy this.  It's only $14.95.  I haven't flocked before, and I've always wanted to try, and these Halloween kits are too stinking cute.  Do I really need to make 500 more Halloween cards?  Probably not.  But I'm hoping once I start with these, I may be brave enough to buy individual pots of flocking and try them on other cards.  I don't know if I've ever seen these at M's, so I may be tempted to pick these up.

4.) Martha Stewart Halloween Glitter Set
That Glow-In-The-Dark Glitter gets me
EVERY.
SINGLE.
TIME.

I can't even count the amount of times I've walked into Michaels, grabbed the bottle, carried it around the store, and then put it back at the last minute.  The black tinsel glitter is really nice too.

5.) Anna Griffin Clear Stamp Storage Binder

I'm a damask FREAK.  My wedding was damask, when I finally get my own craft room, it will be damask, I love ALL THINGS damask.  These are GORGEOUS and I really want them, and you get 2 for $22.00.  Hopefully they stay on the website for awhile and I can get them eventually.


6) Xyron Create-a-Sticker Kit
                                             

I've seen this before (at Tuesday Morning, I believe, and it was cheaper) but I never bought it because I had NO idea how it worked.  Now that I do, I think it's a handy little tool!  Next time I'm at Tuesday Morning I'll have to grab one.

So, what did YOU see on HSN today that you would love to have (or bought)?  I would love to hear your comments.

P.S. I re-did my blog layout, and hopefully comments will work now.  So...this is the perfect opportunity to test it out!  Leave me a comment, my lovely followers!