Showing posts with label Cookie. Show all posts

Wednesday, December 29, 2010

Yummy Holiday Cookies!

I needed to make a huge batch of cookies for a few holiday events last week.  I decided I didn't want to use my Cricut Cake, not because I don't love her (BECAUSE I DO), but because I love making Royal Icing flood cookies.  They taste so yummy and the possibilities are endless with what you can do with them.

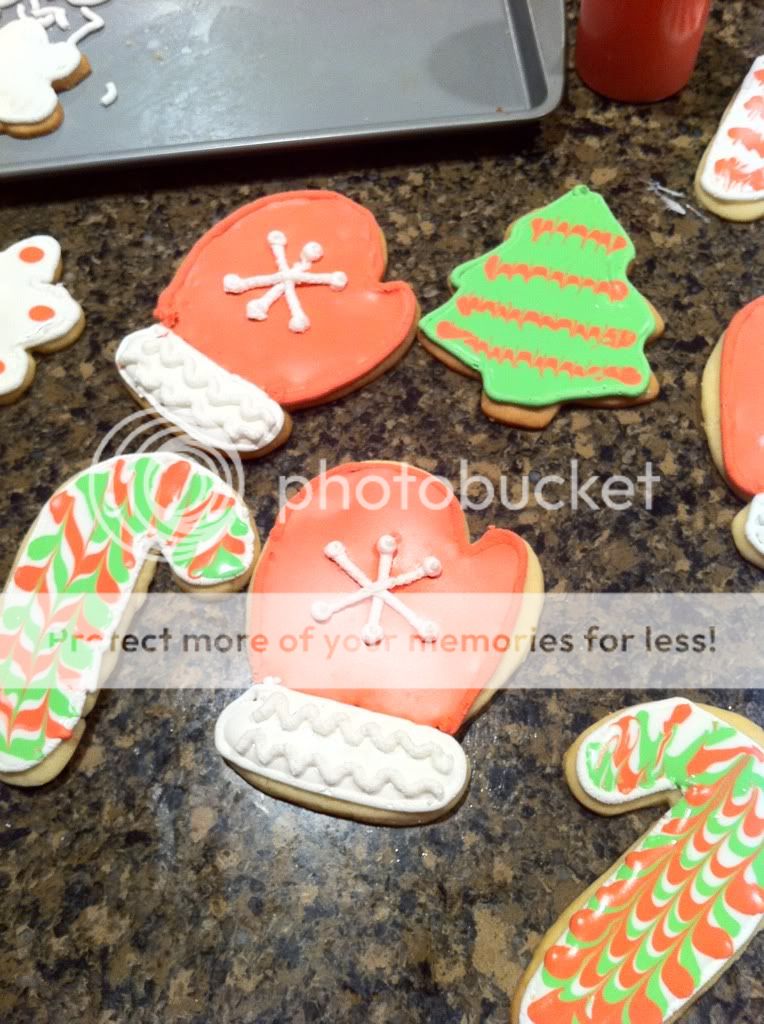
I think the mittens and the candy canes were my favorite.  I used a Christmas cookie cutter set that I have had for AGES for the shapes.  I colored a batch of the stiff royal icing to outline, and then once they had hardened, I added water to the remaining royal to make it flood consistency.  I colored them to match the outlines, filled squeeze bottles, and went to town.

The mittens were fairly simple.  After I flooded the red and white into the mitten and allowed them to dry, I piped white stiff royal on top.
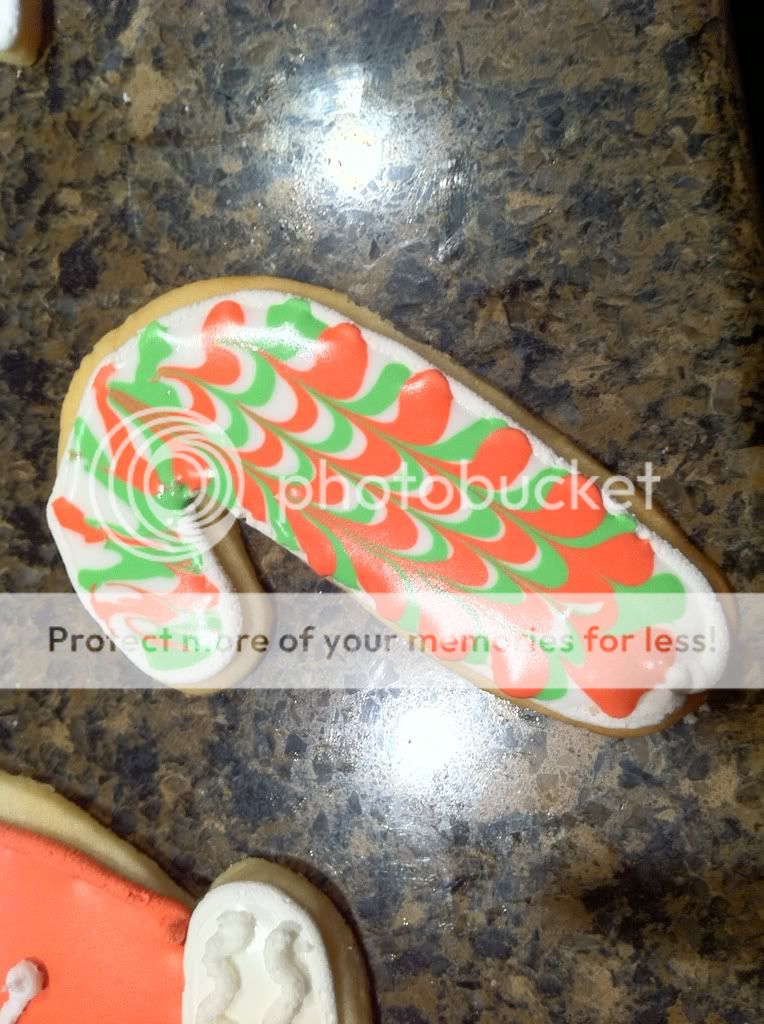
To get the awesome swirl effect, I flood filled the candy canes with white, and then while they were still wet I made red and green stripes.  Because it is still wet the colored stripes sank into the white.  I then took a toothpick and just made lines down the candy cane.  Super simple and it really creates a gorgeous effect.

Here's the recipes I used for the cookies and for the icing.  If you're planning on making shape cookies, this is the all time go-to recipe.  It doesn't spread when baked, so your cookies retain their shape.


No Fail Sugar Cookies – NFSC

Ingredients

  • 6 cups flour
    3 tsp. baking powder
    2 cups unsalted butter
    2 cups sugar (white granulated)
    2 eggs
    2 tsp. vanilla extract or desired flavoring (I like almond myself)
    1 tsp. salt

Instructions

    Cream butter and sugar until light and fluffy. Add eggs and vanilla. Mix well. Mix dry ingredients and add a little at a time to butter mixture. Mix until flour is completely incorporated and the dough comes together.
  1. Chill for 1 to 2 hours (or see Hint below)
  2. Roll to desired thickness and cut into desired shapes. Bake on ungreased baking sheet at 350
  3. degrees for 8 to 10 minutes or until just beginning to turn brown around the edges. This recipe
  4. can make up to 5-dozen 3” cookies.
    HINT: Rolling Out Dough Without the Mess — Rather than wait for your cookie dough to
    chill, take the freshly made dough and place a glob between two sheets of parchment paper.
    Roll it out to the desired thickness then place the dough and paper on a cookie sheet and pop
    it into the refrigerator. Continue rolling out your dough between sheets of paper until you have
    used it all. By the time you are finished, the first batch will be completely chilled and ready to
    cut. Reroll leftover dough and repeat the process! An added bonus is that you are not adding
    any additional flour to your cookies.

    I got my royal icing from Bake at 350.  Actually, I get a TON of my recipes there.  She rocks :)  She even has picture directions, so you really have NO EXCUSE not to make these cookies!

Wednesday, October 20, 2010

Craft Junkie Too Design Team Day: Fall Create a Critter Cookies

Good morning everyone!  I am so excited to debut my FIRST Design Team project for Craft Junkie Too.  Our only rule was that we had to do a Fall themed project, so I decided to do some ADORABLE pumpkin cookies using my Cricut Cake!


 Recipe:
  • 1 recipe "No-Fail" Sugar Cookie Dough
  • Brown Chocolate Fondant
  • Orange Fondant

Here is the recipe for my "No-Fail" Sugar Cookies.  It has been a staple on Cake Central for AGES and is pretty much the go-to recipe for shaped cookies, because it holds its shape really well.  This recipe can be easily halved to make a smaller amount.


  • 6 cups flour
    3 tsp. baking powder
    2 cups unsalted butter
    2 cups sugar (white granulated)
    2 eggs
    2 tsp. vanilla extract or desired flavoring (I like almond myself)
    1 tsp. salt

Instructions

    Cream butter and sugar until light and fluffy. Add eggs and vanilla. Mix well. Mix dry ingredients and add a little at a time to butter mixture. Mix until flour is completely incorporated and the dough comes together.
  1. Chill for 1 to 2 hours (or see Hint below)
  2. Roll to desired thickness and cut into desired shapes. Bake on ungreased baking sheet at 350
  3. degrees for 8 to 10 minutes or until just beginning to turn brown around the edges. This recipe
  4. can make up to 5-dozen 3” cookies.
My cookies spread a little more then I would have liked, but it was UNSEASONABLY humid on the day I made these cookies.  Humidity is key, people!  For the fondant, I used the "Duff" brand I bought at Michaels (also known as Fondarific).

  I have to tell you that I don't normally use store-bought fondant when I bake, but I've yet to be able to tweak my homemade fondant recipes to cut well in my Cake machine.  This brand of fondant tastes really good AND cuts great in the machine, so it's a win win!  It tends to be a little pricey at Michaels, so whenever I can get a 50% off coupon, I stock up for projects like this.  I used the dark brown chocolate  and orange buttercream varieties.  I have to say, being able to buy fondant in a store already colored that doesn't taste like cardboard is always nice :)


I also made cute little tags for the cookies in Create a Critter.  I cut the leaf (the accessory on the Turkey page) at 1 1/2", inked them with Spiced Marmalade Distress Ink, punched holes with my Crop a Dile, and threaded them onto ribbon I found in the Michaels dollar bin.


To create this cute and delicious cookies, I cut the cookie dough AND the fondant with my Cricut Cake.  How in the heck did I cut the cookie dough in my Cake, you ask?  You're in luck!  Today is the debut of my Cricut Cake Video Series, and Episode 1 is cutting cookie dough in your Cake.  Here's the video! 


I hope this video helps you out.  If you have any questions, PLEASE email me or leave a comment with a way to contact you.  Next Cricut Cake Series video is cutting fondant with your Cricut!

Now, hop on over to Craft Junkie Too and check out all of Design Team 2's awesome projects!  I design with some talented ladies :)

Have a fabulous Wednesday!

Monday, August 30, 2010

Monogram Black and White Cookies

This is one of my favorite recent Cricut Cake creations.  Damask is totally trending in the wedding world right now, and how great would these cookies be for wedding favors, or even a bridal shower?

 Here's my recipe for how I made them.  I apologize for not having step-by-step pictures, I made these before this blog was born.  I'll be better next time, I promise :)
Damask Monogram Cookies

  • No-Fail Sugar Cookie Recipe (can be found here)
  • Black and white Fondant (I used Fondarific)
  • Something to use as "glue" (you can use anything from corn syrup, vanilla extract, or even water)
  • Martha Stewart Elegant Cake Art Cartridge  
 ...can I pause for a moment and just say how OBSESSED I am with this cartridge??

If you haven't picked up Marthas carts at HSN, do it NOW.  Run.  Do not walk.  They are the BEST carts for the Cricut Cake.  Everything cuts BEAUTIFULLY.

OK, back to our regularly scheduled programming.
The first thing I did was prepare the cookie dough on my mats.  Yep, you heard me right.  I CUT THE COOKIE DOUGH with the Cricut.  This is a little more complicated then it seems.  Your cookie dough has to be pretty much frozen solid or you WILL NOT be able to cut anything.  It will just tear and smear around the mat and make you pull your hair out.

Not that I know that from personal experience or anything...

I prep my mat with shortening, put a glob of cookie dough on the mat, and cover it with a piece of wax paper.  Then I take my rolling pin and go to town.  Take note: your cookies will have to be pretty thin to cut on the cricut.  

After rolling out the dough, I throw the mats in the freezer and freeze them.  This doesn't take long, so while the dough is freezing I set up my Cricut Cake.

I cut the scalloped circles at 3", and the damask cookies at 3.5", using the Autofill feature.  Each image would cut 9 times on a 12x12" mat.  After I cut them, I froze them AGAIN, to make removal easier.  The frozen cuts slid right off onto a cookie sheet.

While my cookies were baking, I cut my fondant, using the Flourish Frame and Damask image and the shadow on the cart at the same size as the cookies.  "Glue" together with whatever you use, and VOILA!


Trust me, they taste as good as they look :)
Stay tuned!  I have more goodies coming soon!